1. Getting started#
What Ring is#
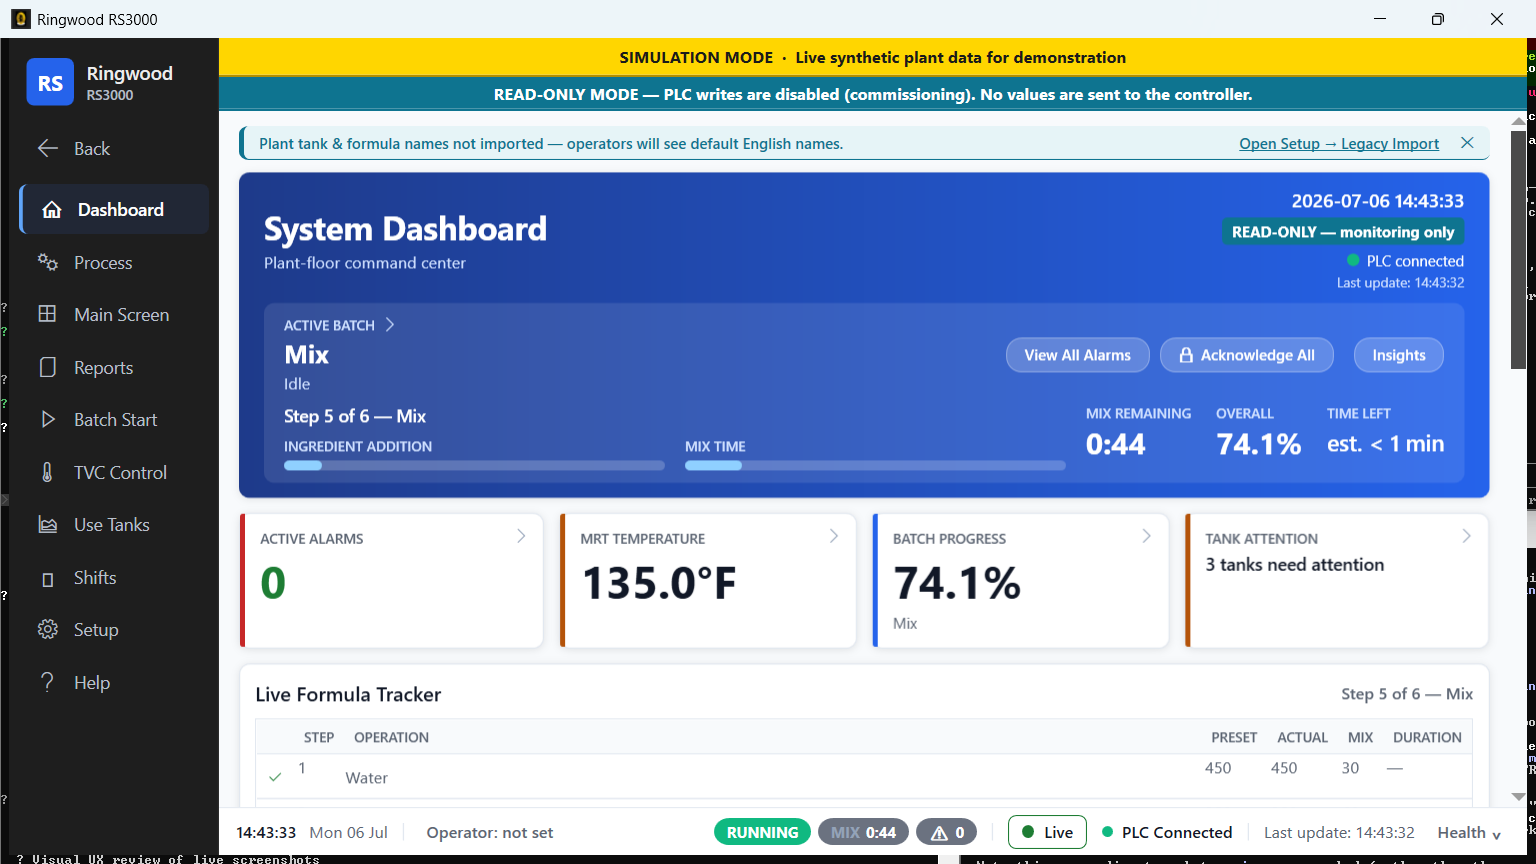
Ring is the touchscreen application that runs the glue kitchen from the LCP
(Line Control PC) on the floor. It replaces the legacy ~RS360 application —
the workflow you already know (pick a tank, pick a formula, start a batch,
watch it run, hold/resume/reset, acknowledge alarms) has not changed. Ring
talks to the plant's Allen-Bradley controller and keeps its own record of
every batch, alarm and setting change in a local database, so Reports can
answer questions the old paper printouts could not.
The application window title bar reads "Ringwood RS3000" — that is Ring's
product name. Do not confuse it with ~RS360, the older application it
replaces; see the glossary if the two names
are confusing on the floor.
Note: Until the plant's write-enabled cutover, Ring runs read-only: every button described in this manual as sending something to the controller is instead validated on screen and not sent. See Read-only mode below.
Warning — Ring is not a safety system. It has no Emergency Stop and no software way to trip the plant. In an emergency, use the plant's physical E-stop, not this application. Process → Hold (see 2.4 Hold, Resume, Reset) is a real, PLC-backed process pause — it is not a safety function. See 3a. Main Screen reference §Make Ready Tank for why this app carries no Emergency Stop or Pause/Resume button at all.
Starting the app#
Ring is set to launch automatically when the LCP boots — you do not normally start it by hand. On boot you will see, in order:
- Splash screen — the Ringwood logo with a loading message and progress bar, typically a few seconds.
- First-run guided setup (new or freshly re-imaged LCPs only) — a step-by-step wizard (language, units, PLC connection, read-only safety, email, plant names, shift schedule) that an installer or supervisor runs once per station. Everyday operators will not normally see this; it can be re-run from Setup → Setup Wizard if it is ever needed again.
- The main window — Ring opens straight to the Dashboard. There is no login screen: nothing blocks you from operating. Instead, you pick your name so the record shows who did what — see Tell Ring who you are below. Supervisor-level Setup screens are separately protected by a password prompt.
Tell Ring who you are#
The bottom status strip always shows the current operator — "Operator: not set" until someone picks a name. Click it to open the operator picker and choose (or type) your name at the start of your shift. This is not a password login; it exists so that batch records, data-entry rows, and the operator audit trail carry your name instead of nobody's. Your choice is remembered across an app restart, so re-pick when a new operator takes over the station — not just after a reboot.
Note: Picking your name is how "who did what" gets recorded on this station. Leaving it on the previous operator's name puts their name on your actions.
Startup warnings — read them before clicking through#
If something is wrong with the station's configuration file
(Config\appsettings.json), a message box appears before the main window:
| Title | Meaning | What to do |
|---|---|---|
| Startup Configuration Error | A required setting is missing or invalid. Ring will not start. | Note the exact text and call IT. |
| Startup Configuration Warning | A setting looks wrong but is not fatal (e.g. a missing folder). A 60-second countdown lets the boot continue on its own if nobody is there to click. | Read it. Click Continue to proceed anyway, or Quit to stop and get it fixed. If you do nothing, it continues automatically after 60 seconds. |
Warning: Never click through a startup message box without reading it. It names the exact configuration problem — that text is what IT needs to fix it.
The main window layout#
Ring's window is a fixed two-column shell:
- Left: the NavBar — a dark 168-pixel-wide rail with the main navigation buttons (see Navigation below). It never scrolls away.
- Right: everything else, stacked top to bottom:
- A PLC connection banner — only visible when the link is not fully healthy (see PLC connection indicator).
- A demo mode banner (yellow) — only visible when demo/training mode is turned on for this station.
- A read-only mode banner (teal) and/or a startup-degraded banner (red) — see Read-only mode and 07-troubleshooting.md.
- An active-alarm banner — a compact red strip that appears on every screen while a fault is present, with a View button to the Alarms screen and a ✕ to dismiss it for now (it returns on the next alarm).
- The screen area — whatever screen you navigated to.
- The status strip — a thin bar across the very bottom, always visible (see below).
Navigation#
Click a button on the left NavBar; most open a popup menu to the right with the screens in that group — click a screen name to open it in the main content area, or click anywhere outside the popup to dismiss it without choosing anything. Dashboard has no popup; it opens directly. A small chevron on the right edge of a NavBar button marks it as one that opens a submenu — a button with no chevron (like Dashboard) navigates straight to a screen instead.
The top-level buttons, left to right as they appear top to bottom on the rail, are: Dashboard, Process, Main Screen, Reports, Batch Start, Use Tanks, Shifts, Setup, Help. (One more rail button, TVC Control — it sits between Batch Start and Use Tanks — exists in the software but ships hidden — its screens write directly to the controller and are held back pending commissioning; the read-only TVC overview under Main Screen → TVC covers the same tanks.) A Back button above them returns to the previous screen once you have navigated somewhere.
The full menu contents (which screens live under which button) are listed
button by button in this manual's own screens-reference chapters —
3, 3a, and
3b — which describe what each
screen actually shows and does, in detail, checked directly against
NavBar.xaml. A parallel menu map also exists inside the app at Help →
Operator Runbook §2.1 (source: OPERATOR_TRAINING_RUNBOOK.md in the Ring
repository) — that copy is regenerated less often, so treat this manual and
the live NavBar as current if the two ever disagree.
Every screen also carries a small ? help button in its header that opens that screen's help topic.
Keyboard shortcuts#
Press F1 on any screen for a pop-up list of shortcuts. The main ones:
| Key | Action |
|---|---|
Ctrl+B |
Go to Batch — search any batch by number or formula name, from anywhere |
F1 |
Show the keyboard shortcuts list |
Esc |
Close the current dialog, open menu, or the shortcuts help |
Enter |
Confirm the default action in a dialog |
Alt+F4 |
Close the application window |
Language#
Ring is fully localized. To change it: Setup → Language, pick a language
from the dropdown. The change applies immediately — no restart needed.
Thirteen languages ship, including Dutch (nl) — the language of the legacy
system this plant replaced. This plant runs Ring in English, and this manual
is written in English to match.
Note: The Help → Alarm Legend screen separately decodes the controller's own Dutch alarm text into English — see 04-alarms-and-attention.md. That is independent of the app's display language.
Demo mode banner#
If a station is configured for demo/training mode, a bright yellow banner runs across the top of every screen saying the data is synthetic. Its exact wording is configurable per station — the current default reads "DEMO MODE — data is synthetic, NOT a real plant"; you may also see an older build's banner, "SIMULATION MODE · Live synthetic plant data for demonstration" (every screenshot in this manual was captured on a station running that older wording — see the note in this book's README). Whatever the exact words, the meaning is the same: demo mode feeds every screen with synthetic data instead of the real controller.
Demo mode is set per station, either directly in the config file or from Setup → Plant Profile → Enable Demo / Training Mode (supervisor-gated). That checkbox does not change the session you are currently looking at — it only takes effect the next time Ring is restarted. That is deliberate (the heavy data pollers and the banner must flip together, not one before the other), but it means a station's next restart can come up in demo mode, with the yellow banner, without anyone having watched it happen.
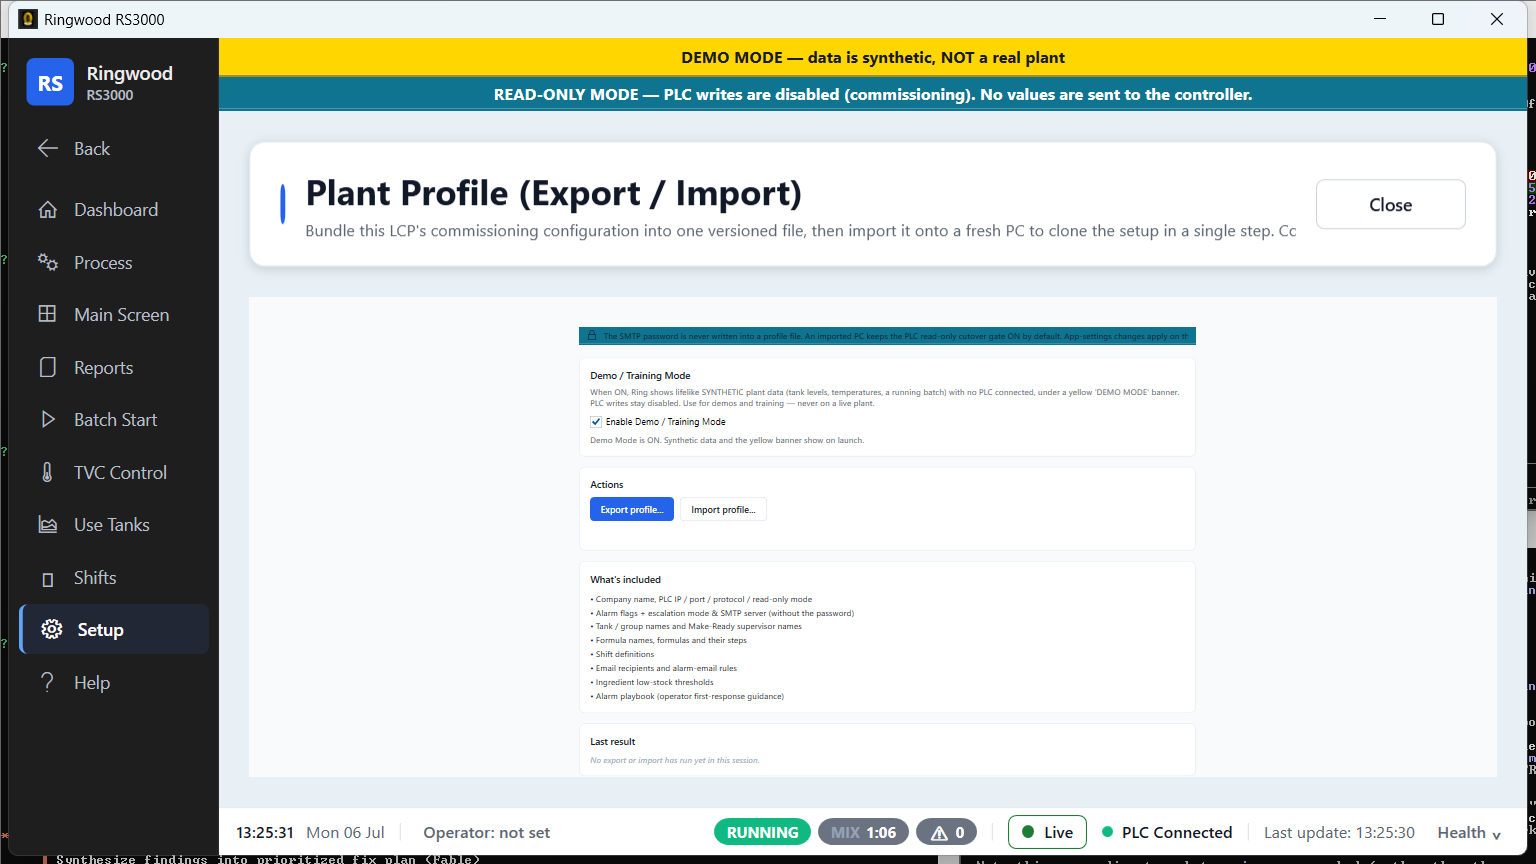
Warning: If you ever see this banner on a station you believe is running the real plant, check Setup → Plant Profile first — someone may have ticked, or left ticked, Enable Demo / Training Mode ahead of a restart — before you call IT. See 07-troubleshooting.md.
PLC connection indicator#
The bottom status strip always shows the PLC link state — a colored dot, short text, and the time of the last successful update:
| State | Dot color | Status text | What it means |
|---|---|---|---|
| Connected | Green | "PLC Connected — <ip>" | Everything is live. |
| Stale | Amber | "PLC heartbeat stale — <ip>" | Reads are still succeeding but the heartbeat hasn't ticked in a few seconds — a brief lag, values are still trusted. |
| Starved | Deep amber | "PLC reachable but heartbeat stopped — controller logic not running (check MainTask / controller state)" | The wire is up but the controller's own logic isn't advancing — most values are not flowing even though the network is fine. |
| Connecting / Unknown | Goldenrod | "PLC connecting…" | Ring hasn't established a first read yet (e.g. right after startup). |
| Disconnected | Red | "PLC Disconnected — <ip>" | No successful read in the last several seconds. Values on screen are the last ones read, not current. |
The IP address shown is always the controller Ring is (or is failing to) talk to — check it against the plant's known PLC address if something looks wrong.
Whenever the link is anything other than fully Connected, the same information also appears as a banner at the top of every screen, with a Retry now button once the link is fully Disconnected. The banner disappears the moment the link is healthy again so it never permanently eats screen space.
Click Health next to the status dot (bottom-right of the status strip) to open a small diagnostics drawer with more detail on the link — useful before calling IT so you can describe exactly what you're seeing.
Read-only mode#
Until the plant's write-enabled cutover, Ring runs with ReadOnlyMode
switched on: every control that would otherwise send a command to the
controller is still shown, and still validates your input, but the write
itself is suppressed. A loud teal banner reading a message to that effect
sits under the demo banner (if any) for the whole session, and individual
screens repeat the notice where it matters most — for example, Batch Start
screens show "Read-only mode — batch will be validated but NOT sent to the
PLC."
This is a deliberate, repo-wide safety gate, not a bug (source: README.md
"The safety model" in the Ring repository) — see
02-running-batches.md for what changes, screen by
screen, once writes are enabled.
Sources verified#
Ring/Views/MainWindow.xaml,Ring/Views/MainWindow.xaml.csRing/Views/SplashScreen.xaml.csRing/Views/App.xaml.cs(startup config validation, first-run wizard gating)Ring/Views/Wizard/StartupWizardSteps.cs,StartupWizardWindow.xamlRing/Views/UserControls/NavBar.xaml,NavBar.xaml.cs(NavDropdownChevronStyle, :118-151 — the chevron marks the popup-opening rail buttons; Dashboard/Back keep no chevron)Ring/Views/UserControls/StatusStripBar.xamlRing/Views/UserControls/ScreenHelpButton.xaml.csRing/Views/Setup/LanguageSettingsScreen.xamlRing/ViewModels/DemoModeBannerViewModel.csRing/Views/Setup/PlantProfileScreen.xaml,PlantProfileScreen.xaml.cs(DemoModeToggle_Changed— persist-only, next-restart wording)Ring/ViewModels/PlcConnectionStatusViewModel.csRing/Services/PLC/PlcHeartbeatConnectionTracker.cs,PlcConnectionState.csRing/Resources/Strings/Strings.en.xaml(banner/shortcut text)Ring/Config/appsettings.json(ReadOnlyMode: true,DemoMode.Enabled: falsedefaults)README.md(repo root)OPERATOR_TRAINING_RUNBOOK.md§2, §3