4. Checking your work#
Authority for this chapter: docs/production-readiness/12_INSTALL_RUNBOOK.md
section 9 (the official 7-step smoke test) restates the same checks in this
chapter, in plain language, and follows the application's own actual
screens where they differ from the runbook's wording — see the note under
Check 4 and
Check 2. docs/production-readiness/09_DB_BACKUP_RESTORE.md
is the authority for where backups live.
Before you leave the site, walk through every check below with Ring open on the plant laptop. Do them in order — some later checks assume an earlier one already passed.
Check 1 — Ring opens to its normal screen, not a warning#
Close Ring completely — there is no File menu; use the window's own close button (top right). A "Close Ring?" confirmation appears, explaining that batch history, alarm and trend recording stop until Ring is restarted (the plant itself keeps running on the PLC regardless) — confirm it. Then start Ring again from the Ringwood HMI shortcut. This time it should go: splash screen → straight to the normal main screen. No warning dialog, no setup wizard (you already finished that in chapter 3).
Note: If you still see the setup wizard on this second launch, it did not save — go back to chapter 3 and make sure you reached the final "You're all set" page and clicked its Next/Finish button, not Finish later.
Check 2 — the title bar#
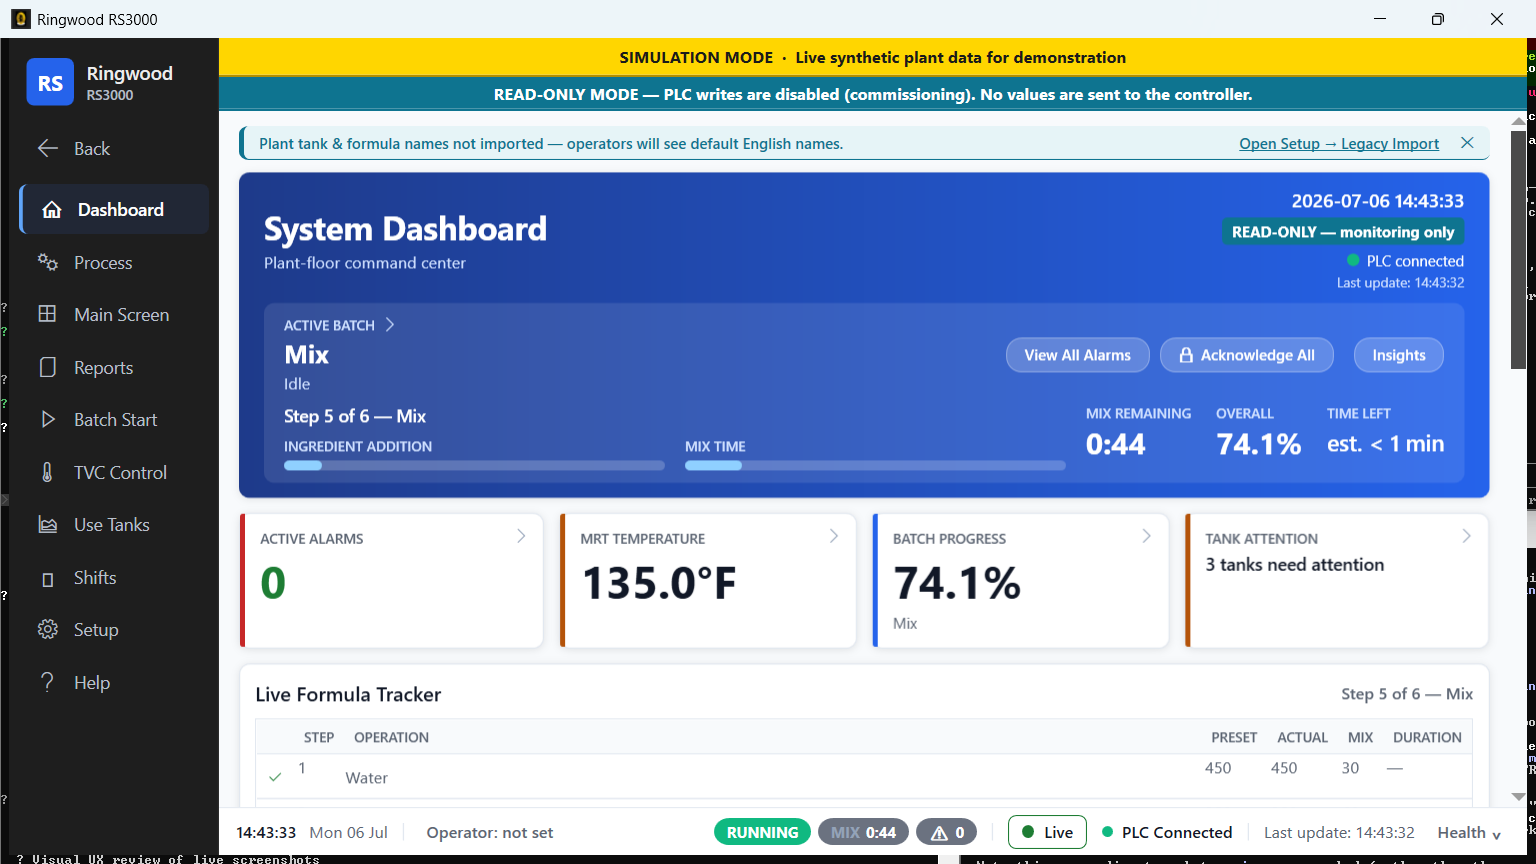
Look at the top of the Ring window. It should read "Ringwood RS3000." This is a fixed label built into the application — it does not change per plant or per station, so do not expect to see this laptop's own name or station number in it.
Note on this book vs. the install runbook: the install runbook describes this step as checking for a title bar reading "Ringwood — LCP-N". That is not what the application actually shows — the title bar text is fixed. This book follows what the application does; if you want to confirm which station this is, that is exactly what your
appsettings.local.jsonvalues in chapter 2 are for, and you can see them again on the wizard's final summary page.
Check 3 — the plant's logo (if you had one to install)#
In this build, the logo file does not appear anywhere on screen or in
any report — do not expect it to, and don't record its absence as a
fault. ImageSettings.CompanyLogoFile / PictureDirectory are read in
exactly two places: the startup checker (which only confirms the file
exists, to avoid nagging you with a warning) and the wizard's branding page
(which writes the setting when you Browse to a file). Nothing that draws
the screen or a report reads it back — the title bar is a fixed
"Ringwood RS3000" (Check 2), and every report header renders Ringwood's own
compiled logo, not a per-plant one.
So: confirm the file is sitting in C:\Ring\Pictures\LogoRingwood.png if
the plant supplied one (this silences a startup warning, which is genuinely
useful), but don't go hunting for it on screen — there is nowhere for it to
show up yet. If the plant specifically asked about their branding
appearing in Ring, tell them plainly that customer logos in the app and in
report headers are not implemented in this build, rather than promising a
follow-up visit will surface it.
Check 4 — the PLC connection indicator#
Somewhere in Ring's status strip along the top or bottom of the main window (not on a separate settings screen) there is a small colored indicator showing the state of the connection to the controller. It has three parts: a plain-language badge, a coloured dot with technical status text and the address Ring is polling, and a "Last update" clock. Read the badge and the address, then compare against this table:
| Badge | Color / text | What it means | Is this expected on your visit? |
|---|---|---|---|
| Live | Green — "PLC Connected — (address)" | Ring is actively talking to the controller and getting fresh data. | Yes, if the plant's network and controller were ready when you set the address in chapter 3. This is the goal. |
| Lagging | Amber/yellow — "PLC heartbeat stale — (address)" | Ring was connected but hasn't heard from the controller in a little while. | Only expected as a brief, passing state — if it sits here, treat it as a problem. |
| Reachable — control logic idle | Amber/yellow — "PLC reachable but heartbeat stopped — (address)" | Ring can reach the controller over the network, but the controller's own logic program is not running. | This is normal on a bench/test rig where the controller program is deliberately not running yet. It should not appear at a live plant — if it does, that is a controls-engineer problem, not something for you to fix. |
| Connecting… | Amber/yellow — "PLC connecting…" | Ring is still trying to establish the connection. | Expected for the first few seconds after Ring starts; should clear on its own. |
| Offline | Red — "PLC Disconnected — (address)" | Ring cannot reach the controller at all. | Not expected once the controller address is correct and the network is up. See chapter 5 if it stays red. |
Read the address, not just the color. Every status string is followed by the address Ring is actually polling. If it reads
127.0.0.1, Ring is talking to this laptop, not the plant — go back to chapter 3, page 4 and fix the address; a green pill against127.0.0.1is not success.If this laptop has
DemoModeturned on (see Check 5 below), this pill is pinned green ("Live") no matter what the real link is doing — it means nothing on a demo station. That setting should never be on for a live plant install.
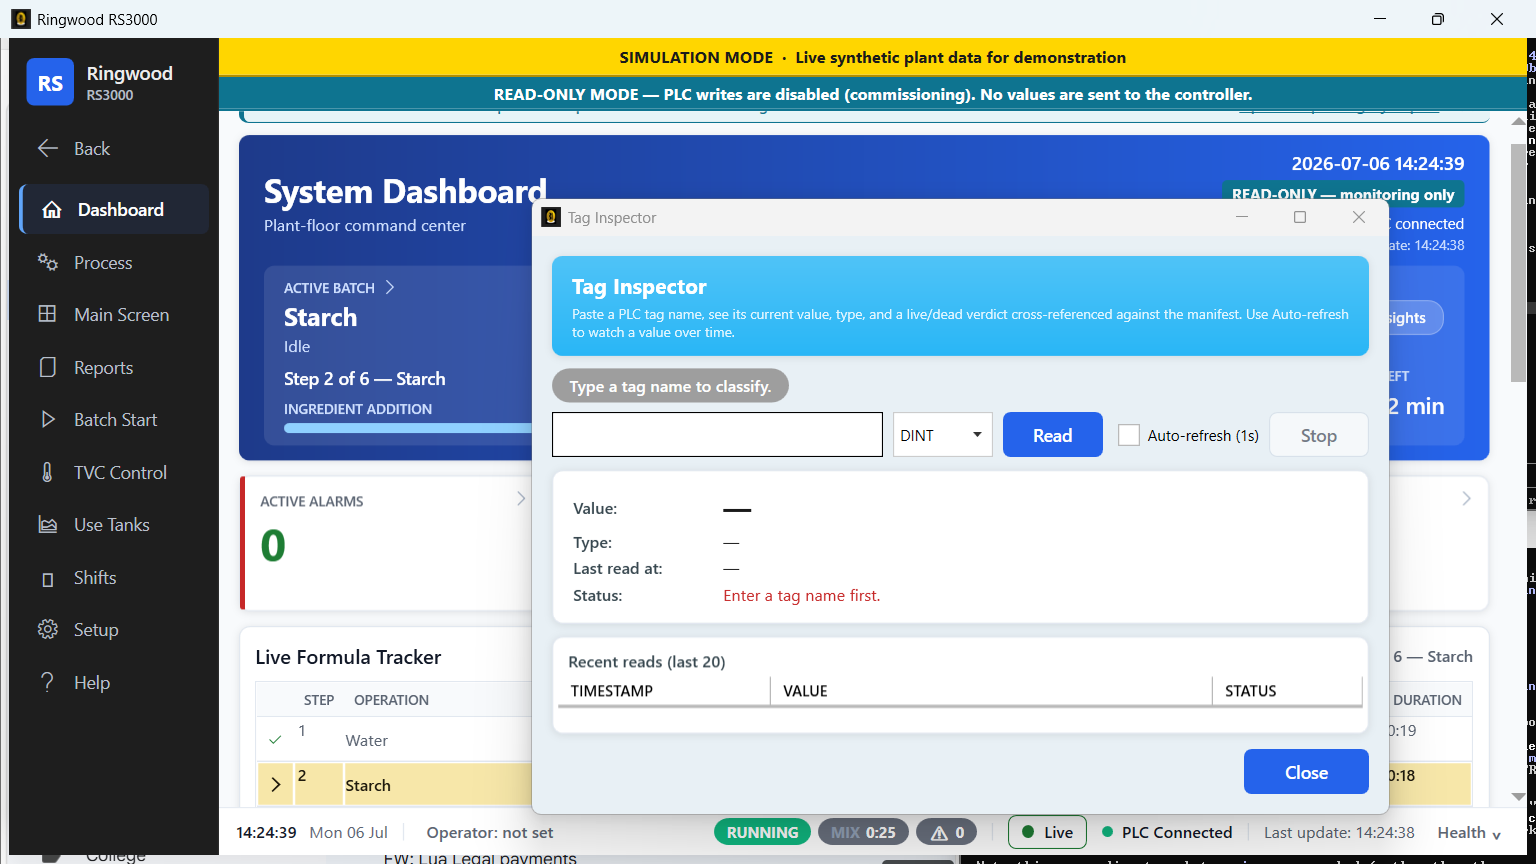
If the indicator is anything other than green: open Setup → Password (supervisor), then Setup → Tag Inspector and read the heartbeat tag — it either comes back with a live value or it names the error directly. Setup → Communication Monitor shows the raw traffic if engineering asks for it. Neither screen writes anything to the controller. Check these before working through chapter 5's ping-and-IP troubleshooting — they are often faster.
Note on this book vs. the install runbook: the install runbook describes reaching this indicator through a "Settings → System → Connection Status" screen. No such screen exists in the application — this indicator is part of the status strip you see on the ordinary main screen at all times, not a separate page you navigate to. This book follows what the application actually shows.
Check 5 — the read-only safety banner is present and correct#
You should see a solid teal-colored banner reading: "READ-ONLY MODE — PLC writes are disabled (commissioning). No values are sent to the controller."
This banner being visible is correct and expected on every install you do, unless this specific visit is the formally scheduled cutover (see chapter 3). If you do not see this banner, stop: it means read-only mode is off. Do not attempt to fix this by editing files yourself — reopen chapter 3's wizard page via Setup → Password (supervisor), then Setup → Setup Wizard, tick "keep read-only mode on," and if it still doesn't reappear, call engineering before leaving the laptop unattended.
Separately, if this laptop happens to have DemoMode turned on (a setting
only engineering would have asked for, for a training or trade-show
station, never for a live plant), you'd also see a distinct yellow demo
banner. The two banners are independent and mean different things — do not
confuse a yellow demo banner with the teal read-only banner, and do not
expect a live plant install to show a yellow banner at all.
There must also be no red banner below the teal one. A separate,
danger-colored banner appears if the database failed to start, or the
saved tank roster couldn't be read — either one forces read-only for the
whole session regardless of your settings file, and the tank cards may be
showing the wrong tanks. If you see it, stop and call engineering; do not
hand over a laptop showing a red banner. Because a database failure can
force the teal banner on even when your settings file says otherwise, also
open appsettings.local.json and confirm PlcSettings.ReadOnlyMode is
still true there, as a second, independent confirmation.
Check 6 — a report actually opens#
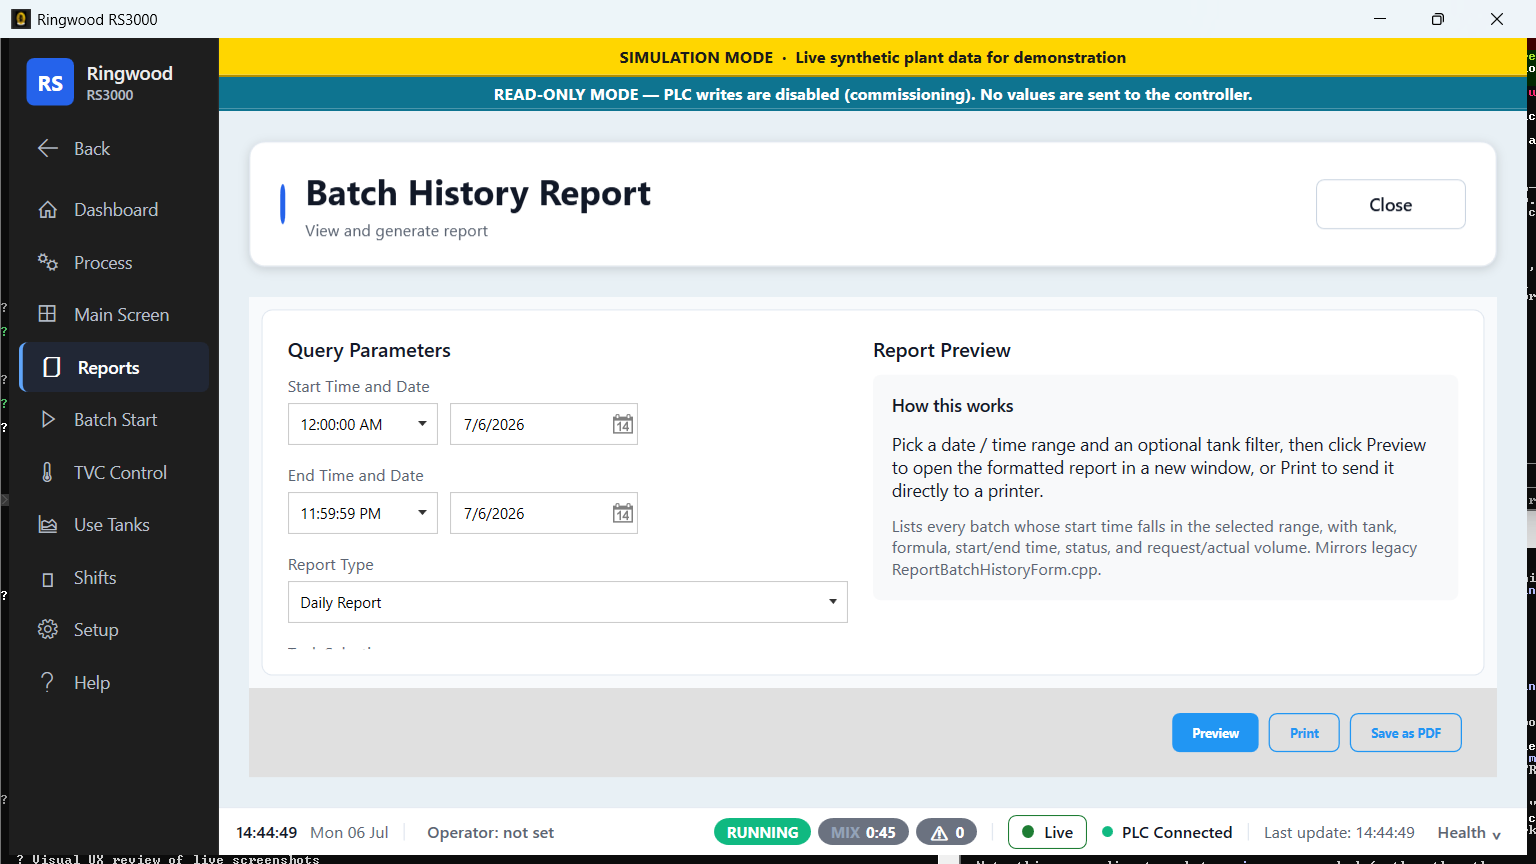
From the main screen, open any report (for example, one of the Batch reports — see the operator manual's report chapter for the full list of what's available once training has covered them). Confirm:
- The report window opens without an error.
- The report shows data (or a clear "no data yet" state) rather than an error message. On a brand-new install with no batch history yet, an empty report is the correct result, not a fault — an error message is the thing to worry about.
Check 7 — the Alarms screen opens#
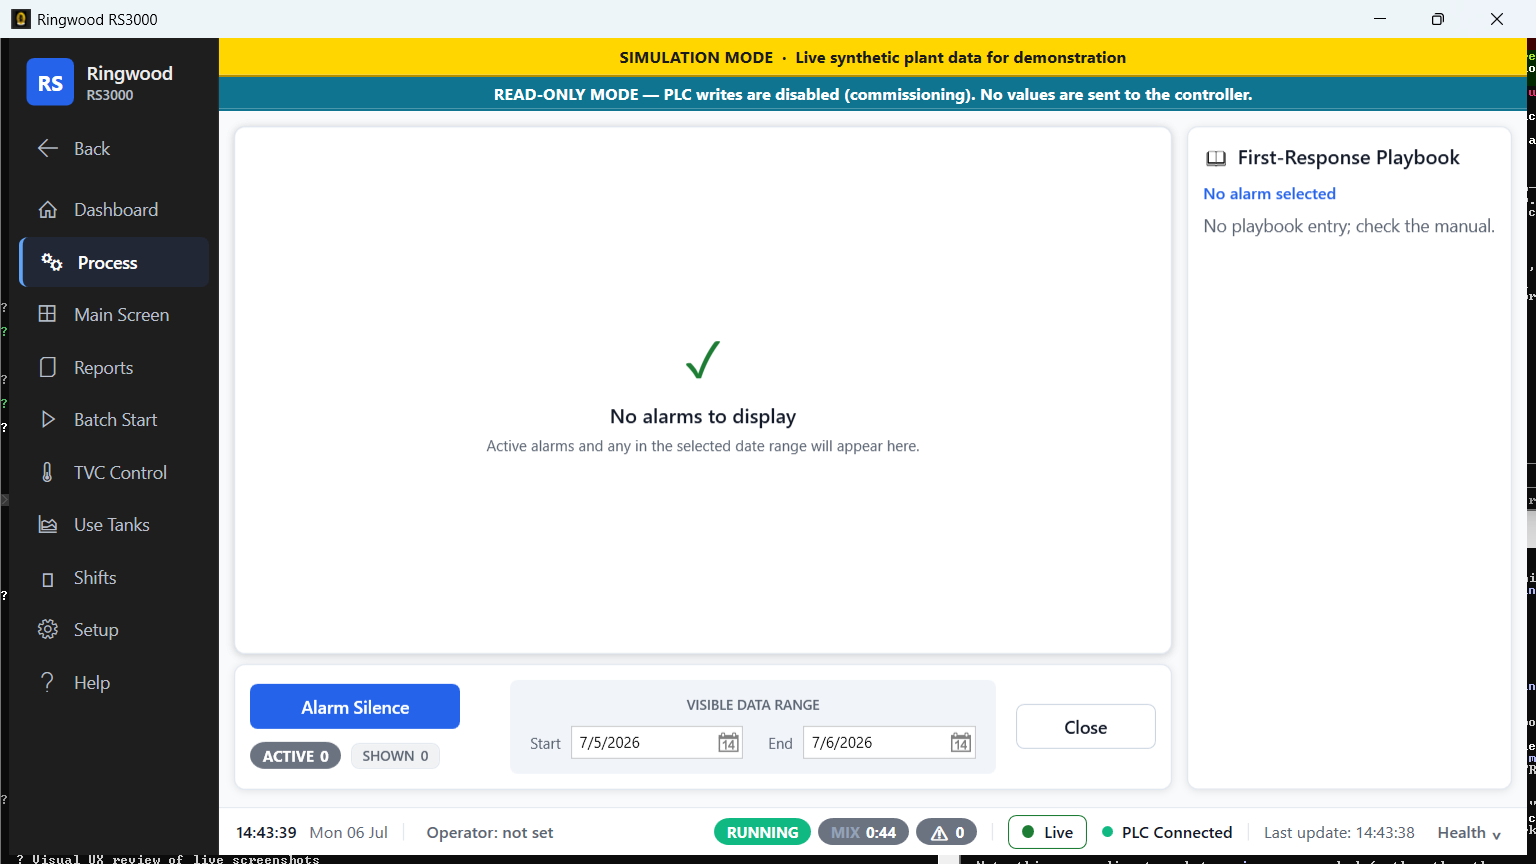
Open Process → Alarms (or the View All Alarms button from the Dashboard) — Alarms is not a top-level item in the navigation rail by itself. It should render an alarm list without crashing — on a bench/test rig with the controller logic not running, this list may be empty or show a fixed set of "not running" alarms; on a live plant with the controller running, it should reflect whatever the controller is actually reporting.
Check 8 — where the database file lives now#
If you added Database.ConnectionString to appsettings.local.json per
chapter 2, Ring's
database file lives wherever you pointed it — confirm that path instead of
the one below. If you left it out, Ring creates it right next to the
application itself, on the same drive as the program files:
C:\Ring\App\RingwoodDatabase.db
You don't need to open or inspect this file — just confirm (in File
Explorer) that it exists and its size is bigger than zero bytes. This is
the file that holds every batch record, formula, and setting from this
point forward. Leaving it in the default location works, but means a
future re-install that removes C:\Ring\App\ (see
chapter 5) would delete it too — that's
exactly why chapter 2 recommends pointing it somewhere else.
Check 9 — automatic backups are happening#
Ring automatically makes a backup copy of its database every time it starts
(this is separate from the manual Setup → Database Backup / Restore
screen operators can use any time). If you added
DatabaseMaintenance.BackupDirectory in chapter 2, confirm backups are
landing there instead. Otherwise, confirm the default location:
- In File Explorer, go to
%ProgramData%\Ring\backups\(type that path directly into the File Explorer address bar). - You should see at least one file named like
RingwoodDatabase-auto-20260901-091500.db— the numbers are the date and time of that backup. - Ring keeps the most recent 7 of these automatically and deletes older ones on its own — you don't need to clean this folder up yourself.
Note: If this folder doesn't exist yet, restart Ring once more (the backup runs at startup) and check again.
Check 10 — the startup log is clean#
Open %ProgramData%\Ring\logs\application.log in Notepad and look at the
entries from your most recent start. Search for the word "validation".
You should find no Configuration validation warning or
Configuration validation error lines from this boot. This matters more
than it sounds: an unresolved warning shows a dialog that waits for a
click, and if this laptop is ever restarted unattended (chapter 2's
watchdog), nobody will be there to click it.
A couple of warnings are expected and harmless on a no-logo install — don't mistake them for a real problem:
ImageSettings.CompanyLogoFile "..." not found in PictureDirectory— expected if you don't have a logo file yet (see Check 3).ImageSettings.ReportBannerFile "..." not found in PictureDirectory— same; this file isn't used by anything yet regardless (see Check 3).
Any other warning or error line is worth reading carefully and, if you're not sure it's safe to ignore, worth a call to engineering before you leave the laptop unattended.
Check 11 — the Manuals Library#
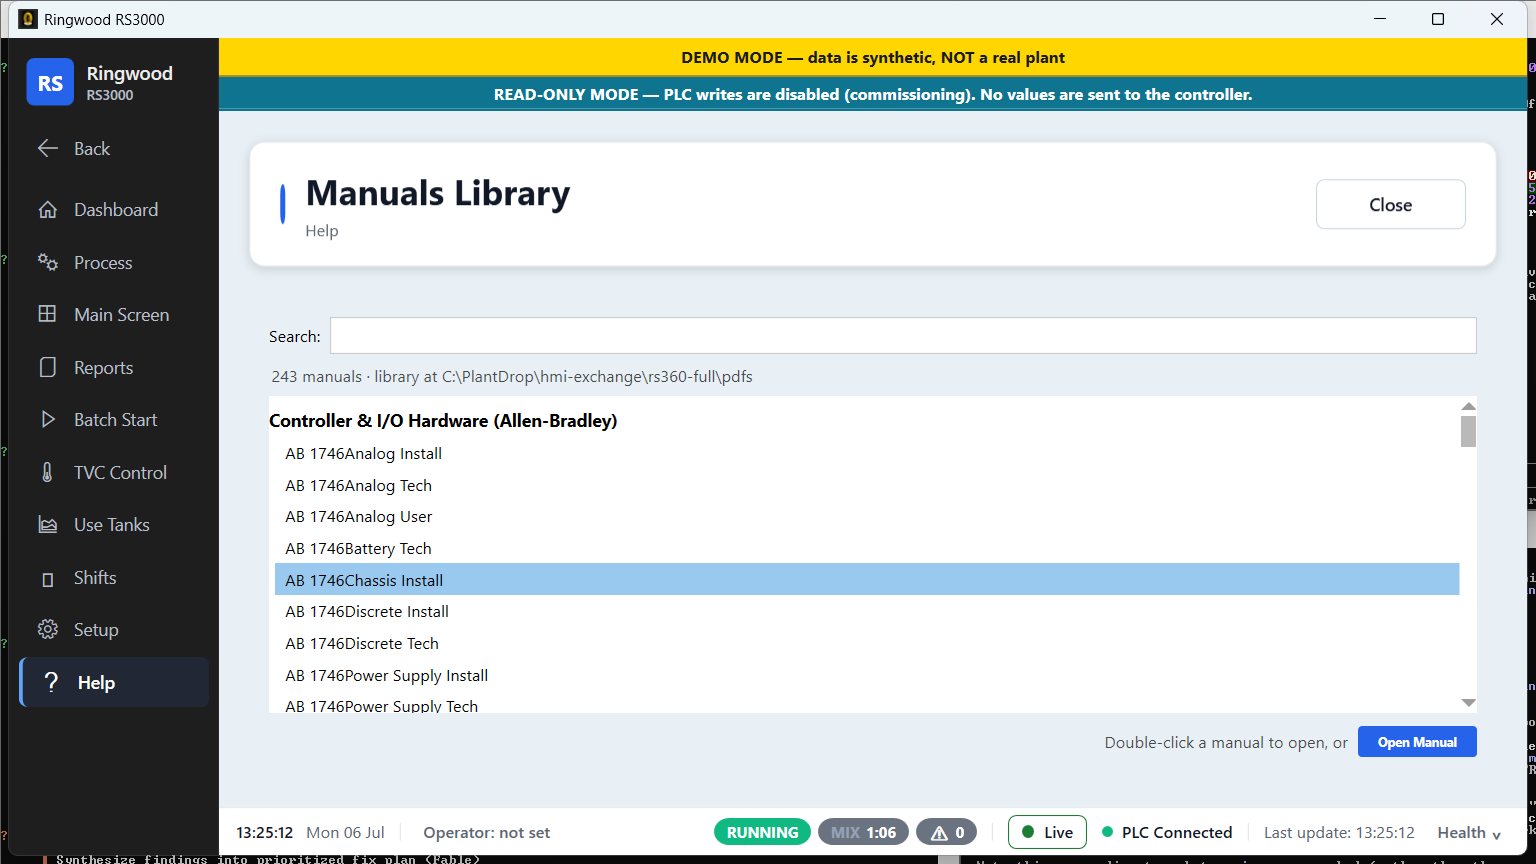
Open Help → Manuals Library. If you copied the PDF library into place in chapter 2, the status line should read "N manuals · PDF library installed", and double-clicking any manual in the list should open it. If you didn't bring the library on this visit, it instead reads "N manuals indexed — PDF library not installed on this PC" — that's expected, not a fault; tell the plant it can be added on a later visit.
Check 12 — export the plant profile#
Before you leave, capture a snapshot of exactly how you configured this
station. Open Setup → Password (supervisor), then Setup → Plant
Profile, click Export, and accept the default filename (something
like plant-profile-20260901-0915.ringprofile.json). Save it to the USB
drive you brought, and plan to send it to engineering along with your
handoff notes.
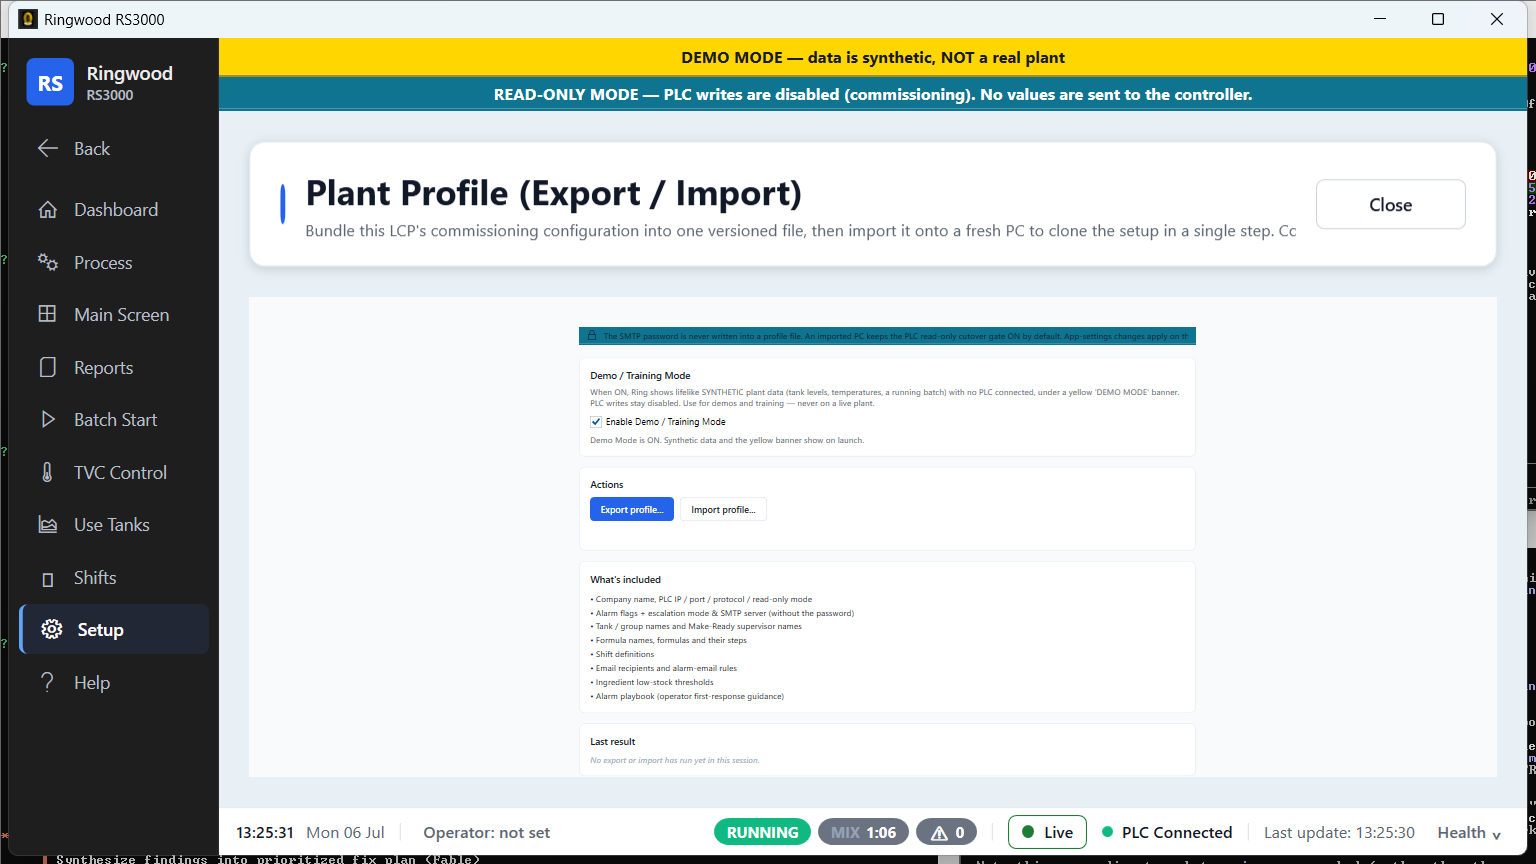
This is one of the most useful things you can do at the end of a visit: the exported file records the tank/group names, formulas, shifts, alarm rules, and hardware options exactly as you left them, and carries the read-only setting so a PC rebuilt from it stays inside the safety gate by default. A future laptop swap or second-station install can start from this file instead of repeating chapters 2 and 3 from scratch. It is deliberately safe to email or leave on a shared drive — the mail server password is never written into the export.
Where everything lives#
Ring's files end up in more than one place. Engineering will ask you for some of these by name — this table is worth photographing before you leave.
| What | Where | Do you touch it? |
|---|---|---|
| Application folder | C:\Ring\App\ |
Yes — this is what you installed in chapter 2. |
| Your settings file | C:\Ring\App\Config\appsettings.local.json |
Yes — you created and edited this in chapter 2. |
| Database file | C:\Ring\App\RingwoodDatabase.db, or wherever Database.ConnectionString points |
Not directly — Ring reads and writes it; you confirm it exists (Check 8). |
| Automatic backups | %ProgramData%\Ring\backups\, or wherever DatabaseMaintenance.BackupDirectory points |
No — Ring manages retention on its own (Check 9). |
| Application log | %ProgramData%\Ring\logs\application.log |
Read-only — you check this (Check 10) and send it if asked. |
| Crash reports (managed) | C:\Ring\App\logs\crashes\ |
Read-only — collected only if something crashes (chapter 5). |
| Crash reports (native, if configured) | C:\Ring\logs\dumps\ |
Read-only — same, only present if the kiosk install script set up crash dumps (chapter 2). |
| Logo image | C:\Ring\Pictures\LogoRingwood.png |
Yes — you copy this in chapter 2, if supplied. |
| Icons | C:\Ring\Icons\ |
No — created for future use; nothing to put here today. |
| Manuals PDF library | C:\Ring\Manuals\ |
Yes — you copy this in chapter 2, if supplied (Check 11). |
Why there are two "logs" folders: Ring's day-to-day application log
lives in the shared Windows data folder (%ProgramData%\Ring\) because
that location stays writable no matter who is logged in. A crash report —
written only when Ring fails hard — lands next to the program itself
instead. Engineering usually wants both when something goes wrong, which is
exactly why the Diagnostic Console's export bundle (chapter 5) tries to
collect what it can in one step — though as chapter 5 explains, it doesn't
currently include either log folder, so collect them by hand as well.
Leave-behind notes for the operators#
Your job ends at a verified, working install — training the operators on how to actually run the plant with Ring is a separate job. Point the people running that training at what the plant can actually open once you've driven away:
- The Operator Manual — published online and as a downloadable PDF, written for the people running the plant day to day, not for you. Leave its glossary page open on the laptop before you go — it defines every term you've been using all day (heartbeat, LCP, read-only mode, TVC, RS3000 vs. RS360, and more): ../operator/08-glossary.md. The manual's front page is ../operator/README.md.
OPERATOR_TRAINING_RUNBOOK.mdis the internal, step-by-step script Ringwood's own trainer works from during a formal training session. It also ships inside the application atC:\Ring\App\Assets\Manuals\and is reachable from Help → Manuals Library (Check 11) — no repository access needed to open it on the laptop itself. If you only have a repository link to it, that link won't open from the plant floor; ask engineering for the copy that shipped in the package instead.- The install, rollback and cutover runbooks (
12_INSTALL_RUNBOOK.md,13_RS3000_ROLLBACK.md,CUTOVER_RUNBOOK.md,STARCH_SYSTEM_CUTOVER_RUNBOOK.md) are the four.mdfiles that shipped at the root of your extracted package (chapter 2) — leave that scratch folder on the laptop or the plant's file share rather than relying on anyone finding them online later.
Before you leave, also make sure whoever will run the training session has:
- The desktop shortcut confirmed working (Check 1 above).
- Told which optional wizard pages you skipped (email alerts, recipients, plant names, shifts — see chapter 3), so training can flag what still needs finishing.
- Confirmed that read-only mode is on, and understands that it stays that way until the formally scheduled cutover — this is worth repeating to them in your own words, since it is the one thing every operator should hear before their first session.
You are done when…#
- Checks 1 through 12 above all passed (or, for Check 4, the network is confirmed not available yet and you've recorded that per chapter 3).
- You know, and have written down, anything that didn't pass and what you did about it (or who you called).
- The person taking over for operator training has what they need from the "Leave-behind notes" section above.
Next: 5. When something goes wrong.
Sources verified#
docs/production-readiness/12_INSTALL_RUNBOOK.md§9 (the 7-step smoke test this chapter restates and corrects against code)Ring/Views/MainWindow.xaml/.xaml.cs(fixed window title, read-only banner markup/text, demo banner distinct from read-only banner, theStartupDegradedBanner, the "Close Ring?" confirmation)Ring/Resources/Strings/Strings.en.xaml(noFile/Exitnavigation key exists;S.Scr.MainWindow.ExitConfirmTitle/ExitConfirmBody; top-level nav labels)Ring/ViewModels/PlcConnectionStatusViewModel.cs(exact PLC status text/color per state, the target-IP suffix, the demo-mode pinned-green override — confirms no separate "Connection Status" screen exists)Ring/Views/UserControls/LinkStateBadge.xaml/StatusStripBar.xaml(the plain-language badge wording)Ring/Infrastructure/Configuration/ConfigurationValidator.cs(the two logo settings' only consumers are the startup existence check and the wizard writer)Ring/Images/ImageLoader.cs,Ring/Services/Reports/BatchReportDocument.cs(confirms no runtime consumer readsImageSettings.CompanyLogoFile/PictureDirectory; reports hard-code the compiled Ringwood logo)docs/reference/plc/APPSETTINGS_REFERENCE.md(ImageSettings.ReportBannerFile— no consumer at all; the nine-key plant-specific cutover list)Ring/Services/DiagnosticBundleService.cs(what the Export Bundle does and does not include)Ring/Views/Help/ManualsLibraryScreen.xaml.cs,scripts/Deploy-Manuals.ps1(manuals library location and "not installed" messaging)Ring/Models/PlantProfile.cs,Ring/Views/Setup/PlantProfileScreen.xaml.cs(plant profile export — password exclusion, default filename, read-only carry-over)Ring/Services/Logger.cs,Ring/Services/CrashLogger.cs,Ring/Services/DatabaseHealthService.cs(log, crash-report and backup folder locations)Ring/Config/appsettings.json(Data Source=RingwoodDatabase.dbresolves next toRing.exe)docs/production-readiness/09_DB_BACKUP_RESTORE.md(automatic startup backup to%ProgramData%\Ring\backups\, default retention of 7 files, file-naming pattern)