3. First start#
Authority for this chapter: Ring/Views/App.xaml.cs (the actual startup
sequence and every warning dialog it can show) and
Ring/Views/Wizard/StartupWizardSteps.cs and the individual step files under
Ring/Views/Wizard/Steps/ (the exact first-time setup wizard — 15 pages as of
the control-and-visibility wave), plus Ring/Services/PLC/EipDiscoveryService.cs,
EipDeviceInfo.cs, and PlcConnectionProbe.cs (the network scan and staged
connection test the PLC connection page uses), Ring/Services/Readiness/ReadinessChecks.cs
and Ring/Services/DataMirrorService.cs / Ring/Services/Export/SqlDumpService.cs
(what the new Readiness and Data Mirror pages actually check and do), and
Ring/Views/Wizard/WizardRestorePointService.cs, CommissioningSheetBuilder.cs,
and Ring/Services/Documentation/InstallationGuideLauncher.cs (the Finish
page's automatic restore point and install record, and the Guide link). Where
this chapter quotes a screen's wording, it was copied from the application's
own text resources, not paraphrased.
Starting Ring for the first time#
Double-click the Ringwood HMI shortcut you created in chapter 2. A splash screen appears with a progress bar and a line of text that changes as Ring starts up — you'll see it step through, in order:
- Initializing Application...
- Loading Configuration...
- Connecting to Database...
- Initializing PLC Services...
- Loading User Interface...
- Starting Control Systems...
- Ready!
This normally takes a few seconds. Nothing to do here but wait — the next thing you should see is either a warning dialog (see below) or the first-time setup wizard.
If a warning dialog appears first#
Ring checks its own configuration and database before it lets you touch anything, and it will stop and tell you in plain language if something is wrong rather than starting up silently broken. You may see one of these. None of them means you did the install wrong by default — read the message box itself; it names the actual problem.
| Dialog title | What it means | What you do |
|---|---|---|
| Startup Configuration Error | The JSON itself is broken, or one of a short list of genuinely required values is missing or empty — the whole Database, PlcSettings, or System section, Database.ConnectionString, or System.CompanyName. (A blank or 127.0.0.1 PLC address is not on this list — that's a Warning, below, specifically so this dialog never blocks you from reaching the wizard that fixes it.) Ring refuses to start at all — this dialog has only an OK button, and clicking it closes Ring. |
Reopen appsettings.local.json from chapter 2 and check it against the template, especially matching brackets and commas. Re-run the ConvertFrom-Json check from that chapter. |
| Startup Configuration Warning | A setting exists but looks suspicious — Ring can still start, so this dialog offers Continue (the default) or Quit, plus a countdown that auto-continues after 60 seconds even if nobody is at the laptop. | Read what it flagged. If you recognize it as expected for this plant, click Continue (or just wait). If not, click Quit, fix it, and restart — or note it and mention it during handoff. |
| Database Integrity Warning | Ring's own SQLite database file reported a problem, but Ring will still start — this is very unlikely on a brand-new install (it usually means an old, damaged database file was carried over). | This should not happen on a fresh install. If it does, stop and call engineering rather than continuing past it. |
| Database Schema Warning | The database file exists but is missing something Ring expects to be able to save batch history to. Also very unlikely on a brand-new install. | Same as above — stop and call engineering on a fresh install; this points at a database file that isn't actually new. |
| Database problem — PLC writes disabled | The database could not be opened or created at all. Ring will still start so you can see the screen, but nothing will be recorded, and (since Ring ships read-only anyway, see below) this mostly matters for history and reporting, not safety. | Confirm C:\Ring\App\ is a folder Windows will actually let Ring write to (not a read-only network share), then restart Ring. If it recurs, call engineering. |
| Tank roster could not be read | Ring's saved list of which tank is which could not be read, so it's using a generic 4-tank default layout, which may not match this plant. | Continue past the dialog, then, once you're in Ring, go to Setup → Password (supervisor), then Setup → Tanks → Configure tank roster (advanced) and set it up for real before treating any tank screen as trustworthy. (Ring's own on-screen banner for this says "Check Setup > Tank Roster" — that's the same screen; there's no menu item with that exact name.) |
| Startup Error / Error during application startup | Something unexpected went wrong before Ring could even get to its main window. Ring closes itself. | The dialog itself tells you where a written report was saved — a folder named logs\crashes next to Ring.exe (that is, C:\Ring\App\logs\crashes\). Zip that folder and send it to engineering along with the exact text of the dialog. Do not attempt repeated retries on your own; see chapter 5. |
| "Ring Already Running" / "Ring Is Starting" / "Ring Not Responding" | You (or a script) tried to open a second copy of Ring while one was already running. Ring only ever allows one copy at a time. | Usually nothing to do — a healthy already-running Ring is simply brought to the front and the second launch closes itself with no dialog at all. If you do see one of these three, it counts itself down and closes on its own after 60 seconds; if the existing Ring seems stuck, see the first row of chapter 5's symptom table before doing anything else. |
Note: Every one of these dialogs prints the specific problem it found, not just a generic error — read the actual text in the box. It usually tells you exactly which setting or file is at fault.
If none of these appear, you went straight from the splash screen to the setup wizard below — that is the normal, expected path on a first install.
The first-time setup wizard#
The first time Ring starts on this laptop (and only the first time, unless someone runs it again on purpose — see the end of this chapter), it opens a step-by-step setup window instead of the normal screen. It walks through 15 pages, in a fixed order, with the same four buttons at the bottom of every page:
| Button | What it does |
|---|---|
| Finish later | Asks for confirmation, then closes only the wizard — Ring itself opens normally to its main screen. Nothing is marked complete, so the whole wizard starts over from page 1 the next time Ring runs. If you haven't yet entered a PLC address when you click this, Ring quietly writes 127.0.0.1 into its settings on the way out — never use Finish later after reaching page 4 without typing in the real plant address first. |
| Back | Returns to the previous page. |
| Skip | Only appears on pages that don't require an answer right now (see below) — moves on without saving anything for this page. |
| Next | Saves this page's answers and moves to the next page. On the last page this button is literally labeled Finish instead of Next. |
Some pages have a Skip button and some don't — that is Ring's own built-in distinction between "must answer before continuing" and "fine to come back to later." Do not treat the absence of Skip as a bug; it means this page genuinely needs an answer before Ring can be used safely or sensibly.
Every page also carries a Guide link in the top-right corner of the header band, above the page content, on every single page — click it to open the shipped Installation Guide PDF on this laptop; if that file wasn't deployed with this build, Ring tells you plainly and gives you the public web address instead, rather than failing silently.
Here are all 15 pages at a glance; the detail for each follows below.
| # | Page title | Can you Skip it? |
|---|---|---|
| 1 | Welcome to Ring setup | No |
| 2 | Language | No |
| 3 | Units | No |
| 4 | Connect to the PLC | No |
| 5 | Read-only safety mode | No — read this one carefully |
| 6 | Passwords | Yes |
| 7 | Email alerts (SMTP) | Yes |
| 8 | Alert recipients | Yes |
| 9 | Sensible defaults | Yes |
| 10 | Name your plant | No |
| 11 | Plant names | Yes |
| 12 | Work shifts | Yes |
| 13 | Data mirror | Yes |
| 14 | Readiness check | Yes |
| 15 | You're all set | No (last page) |
Page 1 — Welcome to Ring setup#
Required — no Skip button. Just an introduction: "A few quick steps to get this station configured." Nothing to enter; click Next.
Page 2 — Language#
Required — no Skip button. Which language Ring's screens should use.
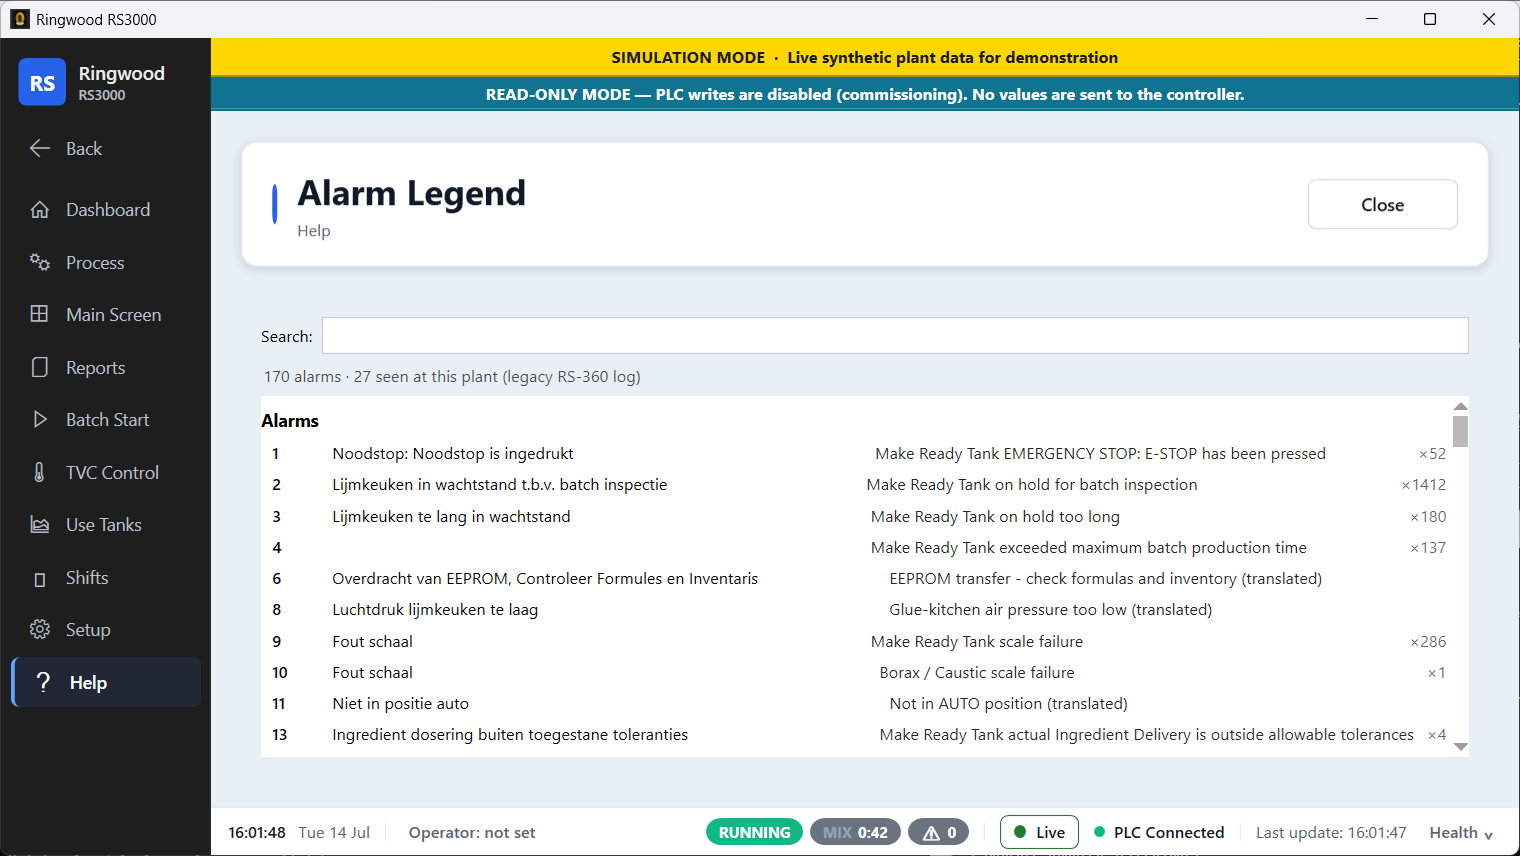
Answer comes from: the settings template — do not guess. If the template doesn't say, ask the plant which language its operators expect before answering; this is exactly the kind of thing that otherwise only surfaces during operator training, and changing it later means re-running this page. Alarm text is available in both languages regardless of this choice, through Help → Alarm legend — worth showing operators at handoff either way.
Page 3 — Units#
Required — no Skip button. Three separate pickers, not one: volume, weight, and temperature, each set independently to US or metric.
Answer comes from: the settings template's chosen unit system, decided ahead of time — not something to guess on site. The page states its own scope plainly, and it's worth repeating to the plant in exactly these words: "This is display-only — plant data is always stored in native units." Changing this choice later is safe (it never touches recorded data) and can be revisited any time under Setup → Display Units.
Page 4 — Connect to the PLC#
Required — no Skip button. The controller's network address and its processor location — found by scanning the plant network, typed in by hand, or both. The page says exactly: "Ring needs to know where the controller sits on the plant network. Use the scan below to find it, or type the address if you already know it. Everything on this page only READS — nothing is ever written to the PLC." The page is three cards, top to bottom, plus a fourth panel that only appears after a successful test (see below).
Answer comes from: the settings template's controller address — the
same value chapter 2 has you put in appsettings.local.json — or the scan
in Card 1, if you don't already have it.
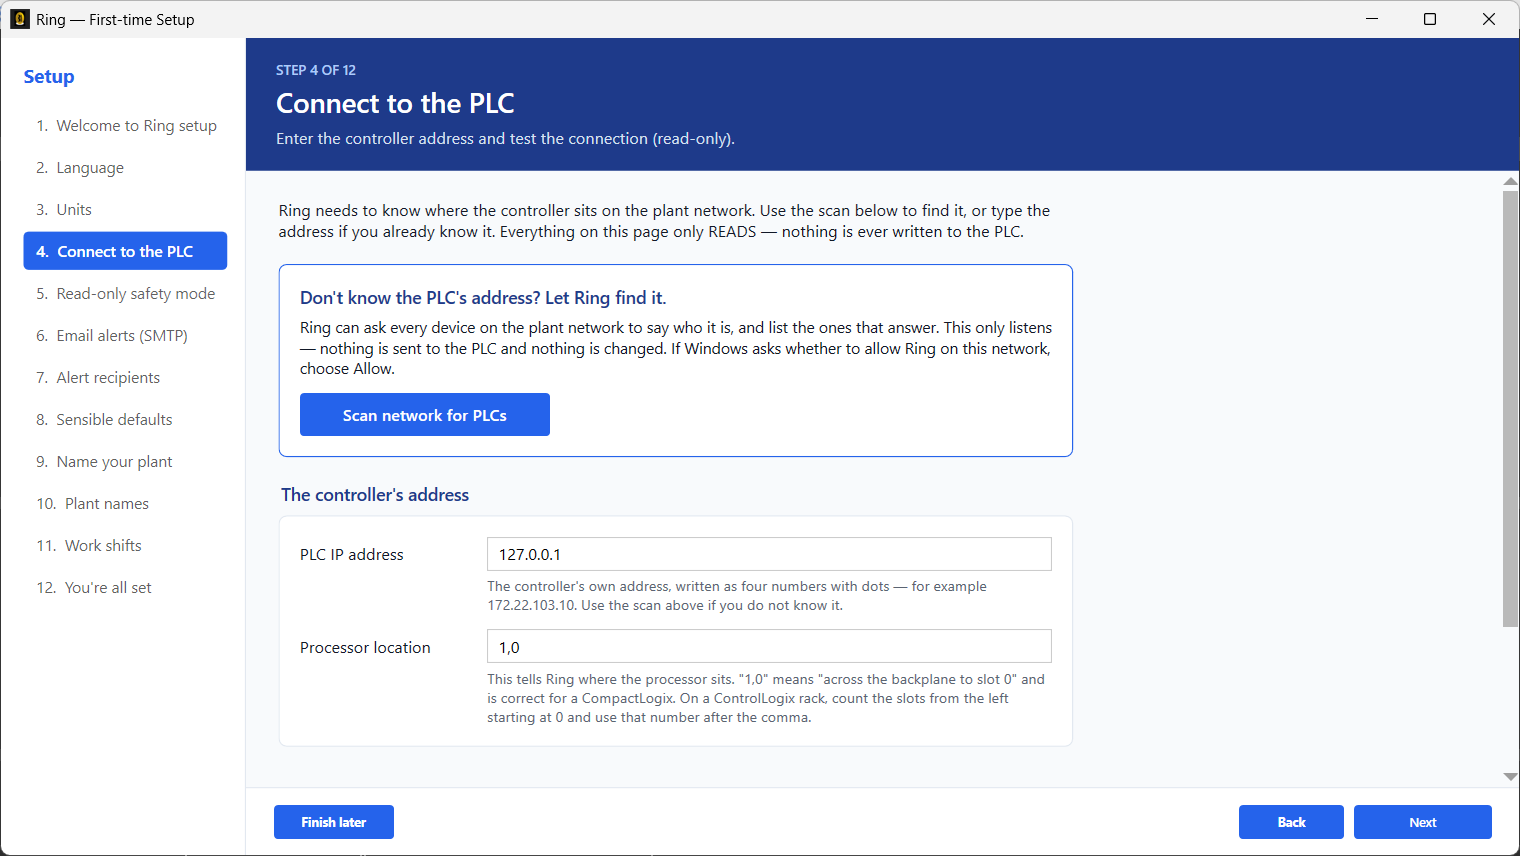
Card 1 — "Don't know the PLC's address? Let Ring find it." The
Scan network for PLCs button asks every device on the plant network
to say who it is and lists the ones that answer; it only listens, and
takes about 3 seconds. While it runs you'll see an indeterminate progress
bar and "Asking every device on the network to identify itself… this
takes a few seconds." This is the same kind of broadcast discovery
chapter 2's Preflight-Check.ps1 already did before Ring was even
installed (see chapter
2) — if you
ran that script and already have the address, you can skip straight to
Card 2 below.
If Windows asks whether to allow Ring on this network, choose Allow. This prompt appears the first time the scan runs on a new network. Dismissing or blocking it makes the scan silently find nothing — which looks exactly like "no PLCs on this network" but isn't.
One of four things happens when the scan finishes:
- One device answers: "Found 1 device. Click it to use its address."
- Several devices answer: "Found N devices. Click the one that is
your controller — likely controllers are marked and listed first."
Each row shows the catalog name in bold (e.g.
1769-L36ERM-QBFC1B), a grey detail line with the address, vendor, firmware, and serial number, and — for a Logix processor only — a green CONTROLLER badge on the right. A device that gave no name of its own shows as "Unnamed EtherNet/IP device." - Devices answer, but none look like a processor: an amber panel reads "None of these look like a PLC processor." — these are drives, adapters, or panels; the PLC may be on a different network, or behind a router the scan can't pass through. Ask the plant's controls engineer for the address.
- Nothing answers: an amber panel reads "No PLCs answered the scan." with a checklist, worked in this order: 1) check the network cable to the PLC panel — the link light must be on at both ends; 2) this PC must be on the same network as the PLC (if you know its address, this PC's own address should start with the same first three numbers); 3) if Windows asked about the firewall, choose Allow and scan again; 4) ask the plant's controls engineer for the address and type it in below.
Clicking a row fills in the address field in Card 2 and confirms "Using
<name> at <ip>. Now press "Test connection" below." For a
CompactLogix only, it also fills in the processor location and adds
"The processor location was set to 1,0 (built-in processor, slot 0)."
For a ControlLogix, it deliberately leaves the processor location
blank — the rack slot is a site fact the scan has no way to know, and
Ring won't guess it.
How proven this is: the network scan is new. It has been tested against synthetic device replies in the app's own test suite, not yet against a real plant network. If you run it on site and it finds nothing, that does not by itself mean the PLC is unreachable — fall back to typing the address into Card 2 below, which works exactly the way it always has.
Card 2 — the controller's address. Two fields: PLC IP address
(help text: "The controller's own address, written as four numbers with
dots — for example 172.22.103.10. Use the scan above if you do not know
it.") and Processor location — this label replaces the older "Path
(port,slot)" wording — with its own help text: "This tells Ring where
the processor sits. '1,0' means 'across the backplane to slot 0' and is
correct for a CompactLogix. On a ControlLogix rack, count the slots from
the left starting at 0 and use that number after the comma." Validation
is immediate and friendly: type something that isn't a valid address and
you get "'<what you typed>' is not a valid address." plus that same
help text again, right there, instead of being accepted and reported as a
network fault later. The same check runs when you click Next, so a bad
value can't be saved by accident.
Card 3 — "Test connection." A progress bar runs while it works. This is a staged, read-only probe — it opens a connection and reads one tag, never writes — and it reports exactly which stage it stopped at, because each stage points at a different physical thing to go check:
- Connected (green) — "Connected to the controller at
<ip>." / "Read PC_Read_Integer[0] =<value>. Nothing was written. Click Next to save this address." - "Nothing answered at
<ip>." — this PC can't reach that address at all. Check the cable to the PLC panel, then check this PC is on the same network. For a dotted-quad address it adds: "For this address, this PC's own address should start with 172.22.103." - "
<ip>answered, but it is not a PLC." — something is switched on there (a PC, a printer, a panel) but it refused the connection. Almost certainly the wrong address — run the scan above and pick the row marked CONTROLLER. - "
<ip>is reachable, but it never answered Ring." — a firewall is dropping the traffic, either on this PC or between it and the panel. Allow Ring through the Windows firewall on this network, or ask IT to open TCP port 44818 to the PLC. - "The controller at
<ip>refused to open a connection." — it IS a PLC and Ring reached it, but it has no free session. Close RSLinx and any other software talking to this PLC, wait about 30 seconds, and test again. (A controller only allows a handful of sessions at once — a laptop left connected in the panel is the usual cause.) - "Reached the device at
<ip>, but no controller answered at 1,0." — the address is right; the processor location is probably wrong. CompactLogix → "1,0"; ControlLogix → count the slots from the left starting at 0. If the location is definitely right, this controller may not be running the plant's batching program.
A hostname that DNS can't resolve gets its own message, telling you to type the numeric address instead or use the scan above.
"Live from the controller" — the proof panel. As soon as Test connection goes green, a fourth panel appears below the result, headed Live from the controller, and starts reading three more tags once a second for as long as this page stays open: the heartbeat counter (the same tag the test itself just read once), the status word, and Tank 1 level — visibly changing in front of you, not just a one-time "Connected" message. This is read-only, exactly like everything else on this page, and it stops the instant you leave the page, click Test connection again, or pick a different row from the scan results.
This field is never blank when you arrive at it — that's the trap. If no address has been set yet, Ring pre-fills this box with
127.0.0.1, and clicking Next past it is not blocked.127.0.0.1means "this laptop," not the plant controller — it is a placeholder, not a real answer, and Ring will not stop you from accepting it. Always overwrite it with the real plant address from the settings template, click Test connection, and don't click Next until the result is green. If you already put the real address intoappsettings.local.jsonin chapter 2, this page shows a yellow banner warning that the override file "wins" over anything you type here — that banner is expected in that case (see chapter 2, "Which file wins"), not a fault.If the plant's network isn't patched through to the controller yet — a routine reality on a first visit — run the scan or type the controller address anyway, let Test connection fail, and continue. Everything else in this install works without the controller reachable. Note it on your install record (chapter 6), tell the plant exactly what remains, and say so plainly at handoff: an install with the PLC unreachable is a legitimate stopping point, not a failed visit.
Page 5 — Read-only safety mode#
Required — read this one carefully. See the next section — this is the most important page in the whole wizard.
Page 6 — Passwords#
Optional — Skip is available. Set the Supervisor and Administrator passwords for this station.
The page shows two matching cards, one per tier — Supervisor password and Administrator password — each with a Current state line, a New password field, and a Confirm password field with a plain Show/Hide toggle so you can check what you typed before saving.
Answer comes from: the site's own chosen passwords, if the plant is ready to set them now. This page is entirely optional: leave every New/ Confirm field blank and click Next (or Skip) to keep whatever is already configured — including the shipped default — and set real passwords later from Setup → Edit Passwords (administrator tier; see Getting into the Setup menu below). Chapter 2 already covers exactly what the shipped default is and why it must be replaced before handoff — see chapter 2's password guidance — this page doesn't repeat that here.
Each tier's Current state line reads one of:
- "a site-specific password is set."
- "still the shipped default ("9999")." — Supervisor only, when the
value is blank,
9999, or aREPLACE_placeholder. - "still the shipped default — blank, which disables administrator sign-in." — Administrator only, when the value is blank.
- "still a placeholder value — set a real password before
commissioning." — Administrator only, when the value is a
REPLACE_placeholder.
If you type a new password that matches one of those shipped/placeholder
values, a non-blocking amber note appears under that tier: "That is the
shipped default value — anyone with the manual can guess it. Consider
choosing a different password." Ring will still let you save it — this is
advice, not a gate. If this station's appsettings.local.json overlay
already defines the password you're changing, Ring updates both files
together, so the one that actually wins at runtime (see chapter 2, "Which
file wins") matches what you just typed.
Note: the Current state line, the while-typing warning, and the Readiness page's Passwords check all recognize every shipped default — blank, the legacy
"9999", aREPLACE_placeholder, and the compiled shared default described in chapter 2 — using the same rule the boot-time configuration validator applies, so this page and the startup warning can never disagree.
Whatever you leave blank on this page is committed as "no change" — Ring never writes an empty password back into the settings file just because you visited here.
Page 7 — Email alerts (SMTP)#
Optional — Skip is available. The plant's outgoing mail server, so Ring can send alarm and report emails.
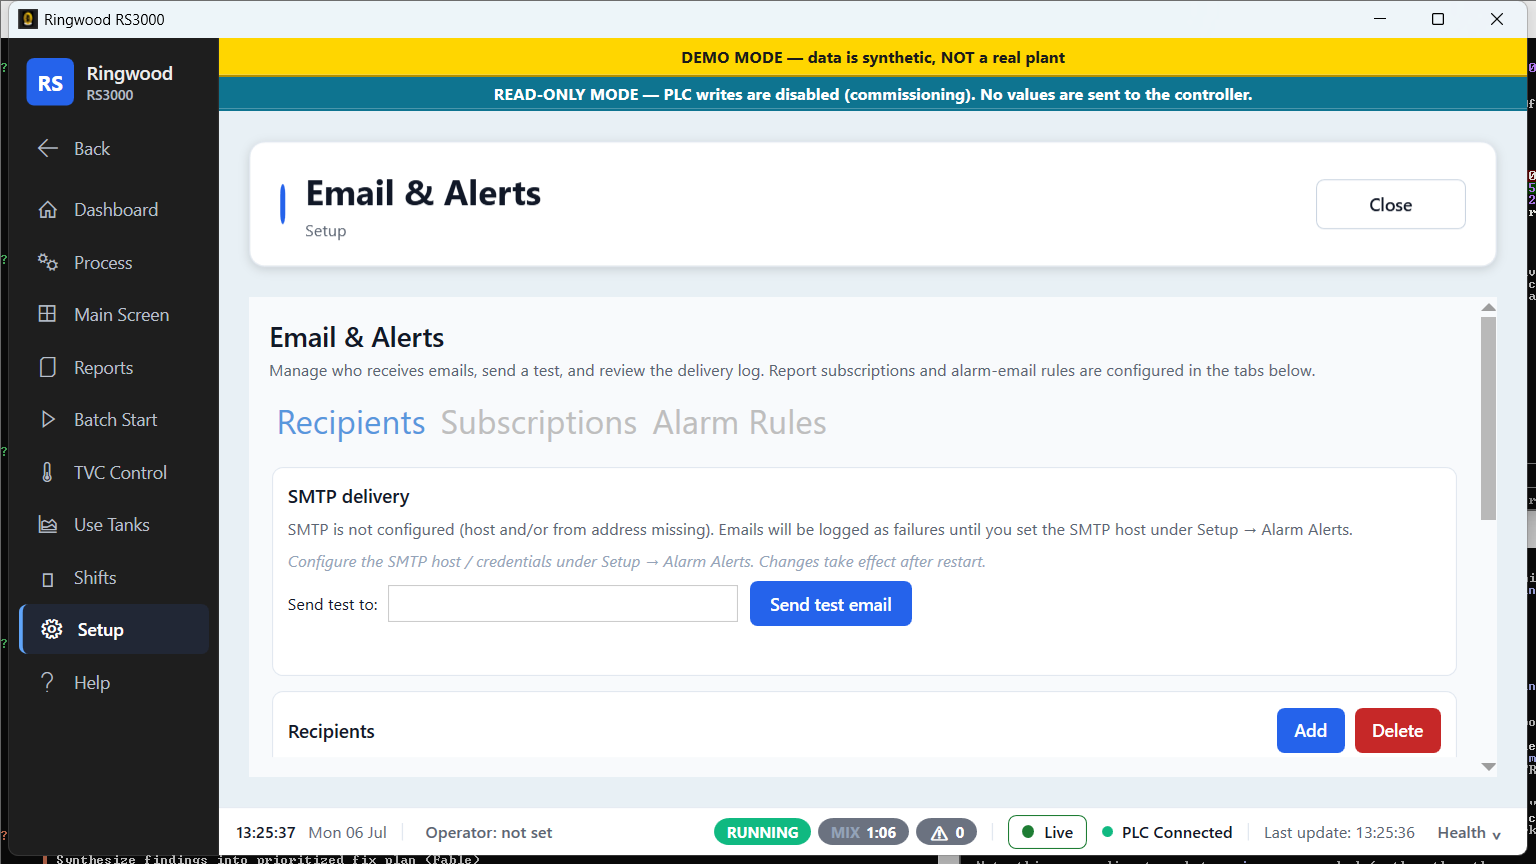
Answer comes from: the settings template, if the plant wants email alerts. If not ready yet, skip it — the mail server itself can be finished later under Setup → Alarm Alerts (supervisor password; see Getting into the Setup menu below). That's a different screen from the one recipients live on, next.
Page 8 — Alert recipients#
Optional — Skip is available. Who should receive alarm and report emails.
Answer comes from: the plant's list of names/addresses, if known. Skip if not decided yet — finish it later under Setup → Email & Alerts (supervisor password).
Page 9 — Sensible defaults#
Optional — Skip is available. Offers to create one starter alarm rule and one starter report email, so the plant isn't starting from a totally empty setup.
Answer comes from: your judgement, or skip and let the plant configure its own from scratch later.
Page 10 — Name your plant#
Required — no Skip button. The company name and logo shown in report headers and on screen.
Answer comes from: the settings template's company name, and the logo
image file from chapter 1 if you have it (it should
already be sitting in C:\Ring\Pictures\ per chapter 2 — this page has its
own Browse button too, if you'd rather point it at the file directly).
If you don't have the logo yet, leave it blank — you can add it later. Be
aware that in this build, the logo you set here does not appear
anywhere on screen or in a report header yet — see the note on Check 3 in
chapter 4
for exactly what it does control.
Page 11 — Plant names#
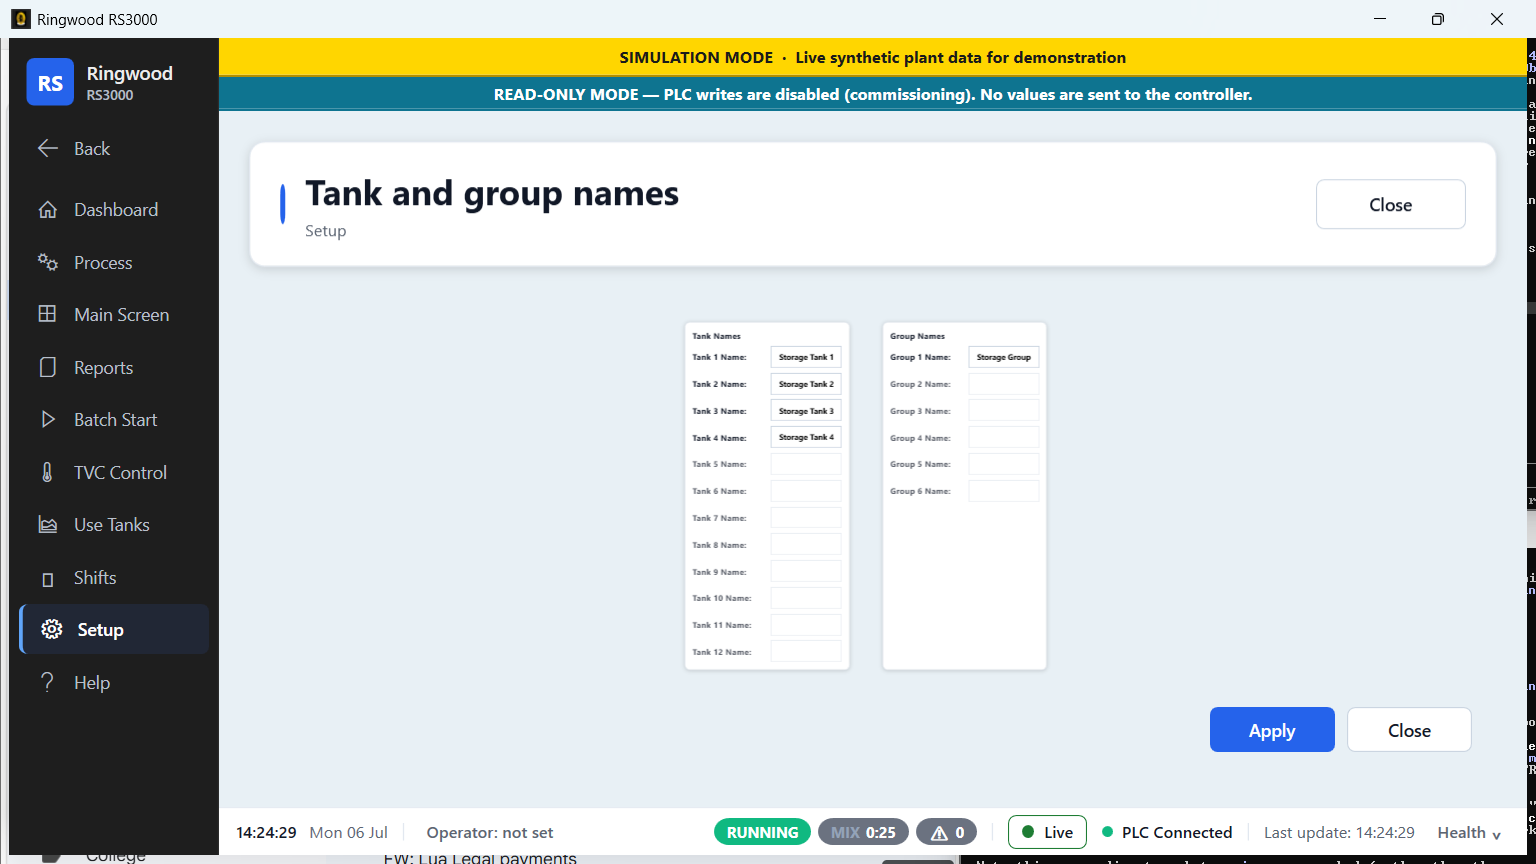
Optional — Skip is available. Offers to import this plant's real tank/equipment names, or use generic English defaults.
Answer comes from: the plant's own naming list, if engineering supplied one; otherwise skip and use the defaults, or set real names later under Setup → Tank and Group Names Edit (supervisor password) — not the tank roster (that maps tank slots to PLC positions; this page and its follow-up screen are just the display names).
Page 12 — Work shifts#
Optional — Skip is available. The plant's shift schedule (names and time spans).
Answer comes from: the plant's actual shift pattern, if known; otherwise skip and set it later under Setup → Shift Names and Spans (supervisor password).
Page 13 — Data mirror#
Optional — Skip is available. An optional second copy of the database, kept somewhere a dead disk on this laptop can't take out with it — your plant's data, automatically copied somewhere safe.
What to do: tick "Keep a second copy of the data in another location," then point Mirror folder at a folder on another drive or a network share — type the path directly, or use Browse…. Click Check folder before saving: Ring creates the folder if it doesn't already exist, writes and then deletes a tiny marker file to prove it can actually write there (a folder can exist and still be read-only — a locked-down share, a drive mounted read-only — so this checks more than just "does the folder exist"), and reports the free space on that drive — for example "'\PLANTSHARE\ring-backup' is writable." followed by "812.4 GB free." A folder Ring can't write to is reported just as plainly: "Ring cannot write to '\PLANTSHARE\ring-backup'." with the underlying Windows error shown beneath it.
What Ring actually does with this, once it's turned on: a full
database export — a plain .sql text file, not a locked binary copy — is
written to that folder once when Ring starts, again every 60 minutes for
as long as Ring keeps running, and once more shortly after every batch
completes. Each copy is written to a temporary file first and only
swapped into place once it's completely finished, so a copy caught
mid-write by a power cut or a dropped network share never leaves a
half-written file sitting where a real one should be. Only the newest 14
copies are kept; older ones are deleted automatically as new ones land.
If the folder later vanishes — the share goes offline, a drive gets
unplugged — Ring does not crash and does not stop running: it logs the
problem and shows a non-blocking warning toast, then simply tries again on
the next scheduled copy.
Changing this later: there is no separate Data Mirror screen in the Setup menu — to turn the mirror on, off, or point it somewhere else after today, re-run Setup → Setup Wizard and revisit this page (the in-app note under the folder field says the same).
Answer comes from: whatever second location the plant actually has available — another local drive, a NAS share, a server folder. Skip this page entirely if there is nowhere else to put a copy yet; nothing else in the wizard depends on this being answered.
Page 14 — Readiness check#
Optional — Skip is available. A live PASS / WARN / FAIL look at whether this station is actually ready, run automatically the moment you reach this page and re-runnable on demand. Purely informational — nothing here blocks Next, and nothing here writes anything to the PLC or the database; it's a checklist for you, not a gate.
Two buttons sit above the list: Re-run checks (runs everything again — useful right after you've fixed something) and Copy report (copies the same PASS/WARN/FAIL text to the clipboard, ready to paste into an email or a ticket).
Ring checks these, in this order, each shown as its own colored row:
| Check | What it looks at |
|---|---|
| PLC connection | Re-runs the exact same staged, read-only probe as page 4's Test connection button. PASS shows the address and the heartbeat value it read; FAIL names which stage it stopped at. |
| Database | Confirms Ring's SQLite file can actually be written to, and reports its journal mode. PASS if writable with journal mode WAL; WARN if writable but in some other journal mode; FAIL if it can't be opened or written to at all. |
| Screen resolution | PASS/FAIL only, against the same 1280×720 minimum as chapter 1's pre-flight check. |
| Passwords | PASS once both Supervisor and Administrator have been changed from the shipped default; otherwise WARN, naming which tier is still default. This shares the exact same check as page 6's Current state line — including the same known gap around a password of literally ringwood called out there. |
| Demo mode | PASS if off; WARN if this station is still showing synthetic demo data instead of the live plant. |
| Data mirror folder | Only appears at all if you turned the mirror on on page 13. PASS if that folder is still writable; FAIL if it is not. |
| Disk free space | PASS/WARN/FAIL against the same low-disk thresholds Ring's own running low-disk alarm uses, measured on the drive holding the database. |
Answer comes from: nothing you type — read it, fix anything WARN or FAIL if you reasonably can before leaving site, and move on. Whatever this page shows the last time it ran is also what gets folded into the Finish page's install record, on page 15, next.
Page 15 — You're all set#
Required — no Skip button (this is the last page). Several cards, top to bottom:
- Your setup — a summary of what you entered (language, PLC endpoint, company, email, alert recipients, plant names), with the read-only safety state shown last, in color: green when read-only is still on, bold red if it has been turned off.
- Good to know — three reminder tips, Ring's own words, not this book's: "You can re-run this wizard any time from Setup → Setup Wizard," "PLC writes stay suppressed while Ring is in read-only mode," and "Email and alert settings live under Setup → Email & Alerts."
- Optional: back up now — the same "Back up the database now…"
button as before, described as "Capture a snapshot of the configured
database before opening Ring — a clean post-commissioning restore
point." Below that button is a line reporting on a restore point Ring
already took automatically, on its own, at the very first Next you
clicked this wizard run — as early as page 1, before anything had
actually changed on disk yet: either "A restore point was saved at
<folder>" — a timestamped folder under Ring's backup area holding a copy of the config files and the database as they were at that moment — or, on a brand-new install with nothing to back up yet, "No restore point was needed — this station had no existing config or database to back up yet." This automatic restore point is separate from, and in addition to, whatever you save manually with the backup button. - Installation record — a Save install record button. It writes a plain-text commissioning sheet — every wizard choice, plus the Readiness page's last results if you ran page 14 — to your Documents folder, and, if you turned on the data mirror on page 13, to that folder as well. Password rows never record an actual value, only whether each tier was left as "shipped default" or has been "set."
What to do: review what's shown; click the backup button if you want a manual backup on top of the automatic restore point (recommended); click Save install record to keep tonight's choices for your own paperwork or the plant's; note the three tips above for the handoff conversation in chapter 4. Then click Finish — this page's Next button is literally labeled Finish, not Next — to open Ring for real.
Page 5, in detail: Read-only safety mode — the one page you must get right#
This page exists specifically so that nobody — installer or engineer — accidentally lets Ring start sending commands to a live controller before the plant has actually signed off on that. Read it slowly. The page shows a large colored banner that changes depending on the current state:
- Green banner, when read-only is on: "READ-ONLY MODE IS ON — Ring will NOT write to the PLC." / "All PLC writes are suppressed and logged. This is the recommended state for observing a live plant."
- Red banner, if read-only were ever turned off: "WARNING: READ-ONLY MODE IS OFF — Ring CAN write to the PLC." / "Ring may send commands to the live controller. Only run in this state during a planned, verified downtime window."
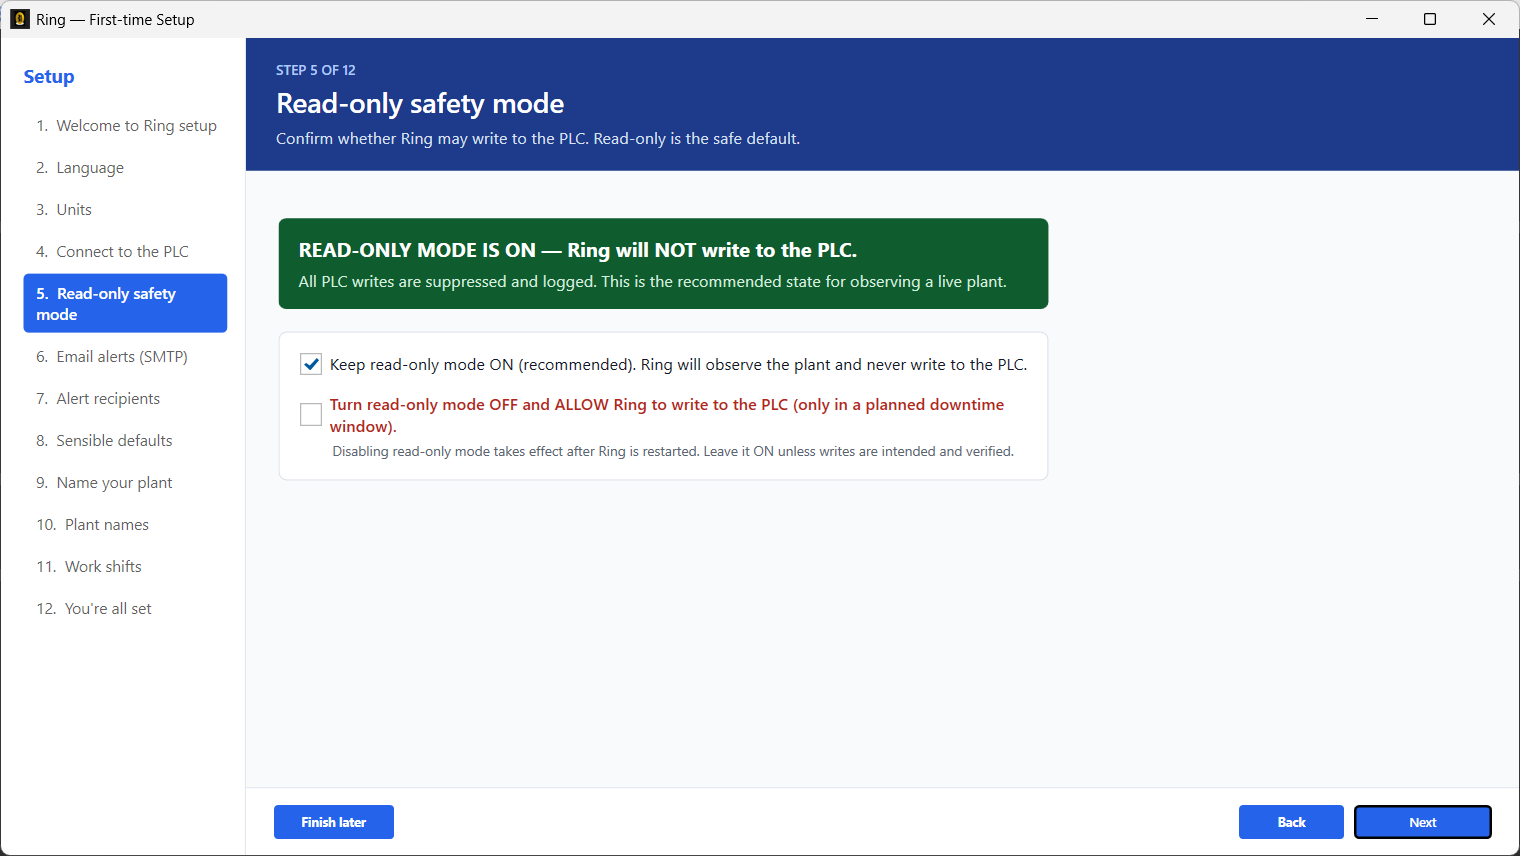
Below the banner are two checkboxes, and they are deliberately set up so you cannot tick both:
- Keep read-only mode on (confirms the safe, current state)
- Enable PLC writes (turns the safe state off)
Warning: leave read-only mode ON. Tick the "keep read-only mode on" checkbox and click Next. Turning writes on is not your decision to make — it is a separate, later, formally-approved event (the plant's "cutover"), run by Ringwood's own engineers against a signed-off checklist. Never tick "Enable PLC writes" during a normal installation visit, no matter who asks you to over the phone, unless you have been explicitly told this exact visit is the scheduled, signed-off cutover. If you are ever unsure which visit this is, stop and ask — do not guess.
If you leave the default alone and simply confirm it, nothing is written to any file at all — Ring only writes to its settings file when you change something on this page. That is by design: confirming a safe state should never touch anything.
Re-running the wizard later#
The wizard automatically appears again on a later restart only if Ring's internal record shows it was never finished, or if a future Ring update changes the wizard enough to need re-asking a few questions. For a routine follow-up visit — filling in the email settings you skipped on day one, for example — you don't need to trigger any of that: once Ring is open, Setup → Password (supervisor), then Setup → Setup Wizard, and it opens the exact same set of pages again, with your previous answers already filled in.
A note on this specific wave of pages. The three new pages — Passwords, Data mirror, Readiness — and the PLC/Finish page updates described above shipped without bumping the wizard's internal version number. That is deliberate: a station that had already finished the wizard under the previous build will not be forced back through it — nothing about those stations changes on its own. Only a brand-new install, or someone deliberately choosing Setup → Setup Wizard to re-run it, will ever see the new pages. If you want an already-commissioned station to get the Passwords/Data mirror/Readiness pages (or the PLC page's live tag panel and the Finish page's install record button), the only way is the manual re-run above — there is no automatic prompt coming for it.
Getting into the Setup menu (you will need this)#
Every "Setup → something" instruction in this book — including the one just above — assumes you can actually get into the Setup menu. You can't, not right away: Setup is locked until you type a password, and this book will send you there ten more times across this chapter and the next two, including as the very first step of chapter 5's own evidence-collection procedure. Read this once now so none of those later instructions stall you.
Tap Setup in the navigation rail. A password box appears — this is normal, not an error.
The two passwords are the
SupervisorPasswordandAdminPasswordvalues you typed intoappsettings.local.jsonback in chapter 2 — or whatever you set on page 6 of the wizard above, if you changed them there instead. Keep them with you for the whole visit; you'll need them repeatedly.There are two tiers, and they unlock different things:
Password Unlocks Supervisor Setup Wizard, Email & Alerts, Alarm Alerts, Tanks (including the tank roster), Tank and Group Names Edit, Shift Names and Spans, Database Backup / Restore, Plant Profile, Tag Inspector, Communication Monitor Administrator Everything supervisor unlocks, plus Diagnostic Console, Edit Passwords, Viscometer, Groups, Data Entry, Factory Reset The single most common surprise: Diagnostic Console is administrator-tier, not supervisor. If you only have the supervisor password and open Setup expecting to find Diagnostic Console for chapter 5's evidence-collection procedure, it simply won't be in the list — that's the password tier, not a missing feature.
Locked out? There is a service override. Ring includes a fixed service override password that installation and service engineers can use at either the Supervisor or Admin prompt, at any site, even after the site has changed both passwords. Use it only when a site's password has been lost or forgotten. The value is never printed in this guide — it is on your commissioning sheet and on the gated engineer download page. Every use is written to Ring's tamper-evident audit journal, naming the screen and tier unlocked, so the site can always see that service access occurred.
Setup re-locks itself automatically after about ten minutes of no activity. If you step away mid-task during a long troubleshooting session, expect to re-enter the password when you come back. Opening the Setup menu again resets that ten-minute clock, so actively working in it keeps it unlocked.
This book never prints an actual password value, and neither should you — don't write one down anywhere it could end up in a ticket, a screenshot, or this book's own install record (chapter 6).
You are done when…#
- The wizard's final page has been completed and Ring has opened its normal main screen (not the wizard, not a warning dialog).
- You are certain the read-only safety page was left on "keep read-only mode on."
- The PLC address on page 4 is the real plant controller address, not the
127.0.0.1placeholder, and the "Live from the controller" panel showed real, changing values. - The Supervisor and Administrator passwords have been changed from the shipped default — or, if not, you know that and have told the plant (page 6's Current state line and page 14's Readiness check both point at this, subject to the known gap noted on page 6).
- You know which optional pages (Passwords, email, recipients, defaults, plant names, shifts, data mirror, readiness) you skipped, so you can tell the plant what still needs finishing.
- You saved an install record from the Finish page before leaving site.
Next: 4. Checking your work.
Sources verified#
Ring/Views/App.xaml.cs(splash sequence, every startup warning dialog and its exact text, the single-instance second-launch dialogs)Ring/Views/SplashScreen.xaml.cs(the seven loading messages)Ring/Views/Wizard/StartupWizardSteps.cs(BuildDefault()'s 15-step order,CurrentVersionleft at 3 for this wave,ShouldShowre-prompt logic)Ring/Views/Wizard/StartupWizardWindow.xaml/.xaml.cs(Finish later / Back / Skip / Next-vs-Finish button labels; the Guide button andGuideButton_Click;NextButton_Click'sWizardRestorePointService.EnsureTakenOncecall;CancelButton_Click's confirmation prompt and itsEnsurePlcIpConfigured()loopback write; the "STEP {0} OF {1}" step counter)Ring/Views/Wizard/Steps/*.xaml.cs(each step'sTitle,Subtitle, andIsOptional)Ring/Views/Wizard/Steps/PlcConnectionStep.xaml.cs/.xaml(the127.0.0.1pre-fill,TryCommit's validation, the overlay-shadowed warning banner, the three-card scan/address/test layout, and the "Live from the controller" panel:StartLiveTagsTimer, the 1-secondDispatcherTimer, and the heartbeat/status-word/Tanks[1].Leveltags it reads)Ring/Services/PLC/EipDiscoveryService.cs/EipDeviceInfo.cs(the ListIdentity network scan, its ~3-second listen window, and the controllers-first / then-by-address sort of the results list)Ring/Services/PLC/PlcConnectionProbe.cs(the staged, read-only Test connection probe and its six reported outcomes)Ring/Views/Wizard/Steps/ReadOnlySafetyStep.xaml.cs(the mutually-exclusive checkboxes, the restart-gate/immediate-effect logic, the exact banner text)Ring/Views/Wizard/Steps/PasswordsStep.xaml.cs/.xaml(IsShippedDefault,DescribeCurrentState,TryValidateNewPassword, the shadowing-overlay mirror, and the confirmed absence of a"ringwood"check — cross-checked againstConfigurationValidator.cs'sShippedDefaultPasswordconstant, which DOES check for"ringwood")Ring/Views/UserControls/PasswordRevealBox.xaml.cs/.xaml(the masked/revealed Show-Hide toggle)Ring/Views/Wizard/Steps/DataMirrorStep.xaml.cs/.xaml(the enable checkbox, folder browse/check,ReadinessChecks.ProbeFolderWritable, and the absence of any Setup-menu screen for this setting — confirmed againstRing/Views/UserControls/NavBar.xaml(.cs)andRing/Views/Setup/)Ring/Services/DataMirrorService.cs(the on-startup / 60-minute / post-batch dump schedule, the 14-copy retention viaPruneOldDumps, and the non-blockingToastServicewarning on a failed dump)Ring/Services/Export/SqlDumpService.cs(the.partial-file-then-atomic-rename durability of each mirror dump)Ring/Views/Wizard/Steps/ReadinessStep.xaml.cs(BuildChecklist's exact check order and each check's PASS/WARN/FAIL wording)Ring/Services/Readiness/ReadinessChecks.cs(ProbeFolderWritable,ClassifyDiskSpace,ClassifyScreenResolution, and the plain-text report format shared with the Finish page's install record)Ring/Views/Wizard/WizardRestorePointService.cs(the automatic restore point taken on the wizard's firstNext, its timestamped folder name, and config+database snapshot contents)Ring/Views/Wizard/CommissioningSheetBuilder.cs(the install record's file name and plain-text format)Ring/Views/Wizard/Steps/FinishStep.xaml.cs/.xaml(the four Finish-page cards,RenderRestorePointNote,SaveInstallRecordButton_Click, andGatherChoices's password-value-free rows)Ring/Services/Documentation/InstallationGuideLauncher.cs(the shipped PDF path, the public fallback URL, and the threeOpenResultoutcomes)Ring/Views/Wizard/Steps/UnitSystemStep.xaml.cs(the three independent unit pickers)Ring/Resources/Strings/Strings.en.xaml(exact quoted text for the PLC connection page, the Units page, the Passwords/Data Mirror/Readiness pages, the Finish page, and the common button labels)Ring/Views/UserControls/NavBar.xaml/.xaml.cs(Setup menu password gate, the supervisor/admin button allowlists, the 10-minuteSetupAuthTimeoutidle re-lock,TanksButton→TankSetupSelectionScreen→TankRosterScreen)Ring/Views/Setup/TankSetupSelectionScreen.xaml.cs(the real "Configure tank roster (advanced)" path)Ring/Infrastructure/Configuration/ConfigurationValidator.cs(which conditions are fatal errors vs. advisory warnings — confirms a missing/blank PLC address is a warning, not a boot-blocking error; also the source of the"ringwood"shipped-default check the wizard's Passwords/Readiness pages do NOT mirror)Ring/Views/StartupWarningDialog.xaml.cs(Continue/Quit choice on the warning dialog, 60-second auto-continue)